Letisim · eSIM
Install your eSIM step by step
First add the eSIM to your phone. At your destination, choose it for data and turn on roaming. Here is exactly what to tap.
Sign in with your purchase email. Check the plan’s start conditions before installation.
03 / Installation
Install your eSIM step by step
Your first eSIM? Here is what to open and what to tap.
Check the exact model, regional variant and system version. If Add eSIM or EID is missing, contact support before buying. A brand name alone does not confirm compatibility.
Manufacturer’s instructions · iPhone ↗
Manufacturer’s instructions · Google Pixel / Android ↗
Manufacturer’s instructions · Samsung ↗
Manufacturer’s instructions · Huawei ↗
Manufacturer’s instructions · Honor ↗
Manufacturer’s instructions · Xiaomi / Redmi ↗
Manufacturer’s instructions · Motorola ↗
Manufacturer’s instructions · OPPO ↗
Manufacturer’s instructions · OnePlus ↗
On iOS 26, a Turn On Travel eSIM notification may appear after arrival. Choose the travel line for data and check whether you also want to keep your home line active. If no notification appears, use the manual steps below.
Check when your package starts: at payment, installation or first connection. If it starts on installation, install nearer your trip. Installing later does not postpone a package that started at payment.
These screens show settings on the models named below. Your operator and eSIM labels will differ. Screens retain the source language; each caption translates and identifies the control to use. Tap any image for a closer look.
iPhone 17 · iOS 26 · Screen source ↗
Before your trip · install the eSIM
Use a stable Wi-Fi connection or hotspot. Your exact phone model must support eSIM and be unlocked for other operators.
- 01
Open your eSIM installation
Connect the phone you will use for your eSIM to Wi-Fi. Choose one of the two options below. If this eSIM is already installed, skip to choosing the line for mobile data.
The button or camera did not open setup?
You can add the eSIM by scanning its QR code in Settings. Follow the path below, choose the QR scanner and use the code for your own purchase. If the QR is on this same phone, see the options without a second screen below the guide.
iPhone: Settings → Mobile Service / Cellular → Add eSIM → Use QR Code → Scan QR Code → Continue
Google Pixel / Android: Settings → Network and Internet → SIMs → Add SIM → Set up an eSIM → scan your QR → Set up
Samsung: Settings → Connections → SIM manager → Add eSIM → Scan QR code → Add → Next
Huawei: Settings → Mobile network → SIM management → SIM 2 → Add eSIM → Add eSIM → Scan code → Add this eSIM
Honor: Settings → Mobile network → SIM management → Add eSIM → Add eSIM or transfer from your device → Set up an eSIM → Set up
Xiaomi / Redmi: Settings → Mobile networks → Use eSIM → Manage eSIM → Add eSIM → Add eSIM → scan your QR → confirm download
Motorola: Settings → Network & Internet → SIMs & mobile network → Download new SIM → Set up an eSIM → scan your QR → Set up
OPPO: Settings → Mobile network → SIM & eSIM settings → Add eSIM → Set up an eSIM → scan your QR → Set up
OnePlus: Settings → Mobile network → eSIM → Add eSIM → Add eSIM → Next → scan your QR → Set up
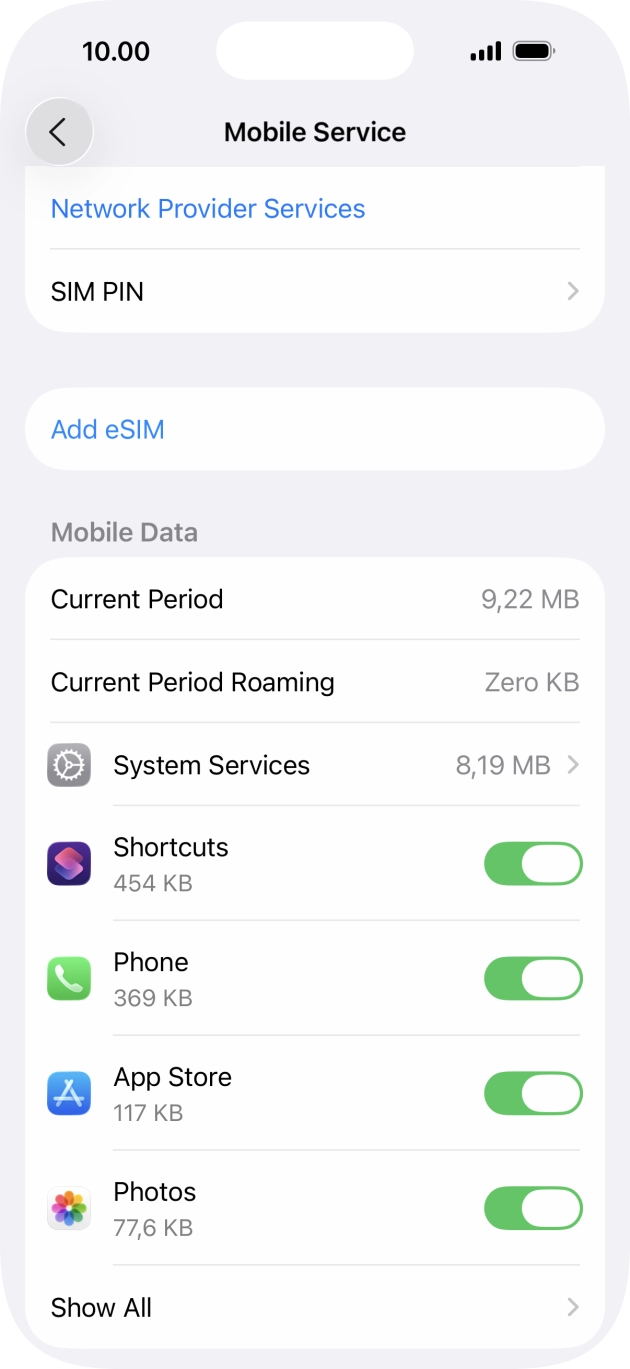 Enlarge screen ↗
Tap Add eSIM to add your travel eSIM. Screen source ↗ - 02
Confirm installation on your phone
The install button or your QR code opens the phone’s system setup. Confirm that you want to add the eSIM, then stay connected to Wi-Fi until the profile finishes downloading. If the phone first asks how to add an eSIM, use your QR code. You do not need to transfer your home SIM from another phone.
Continue / Add / Install / Set up → wait for the eSIM to download
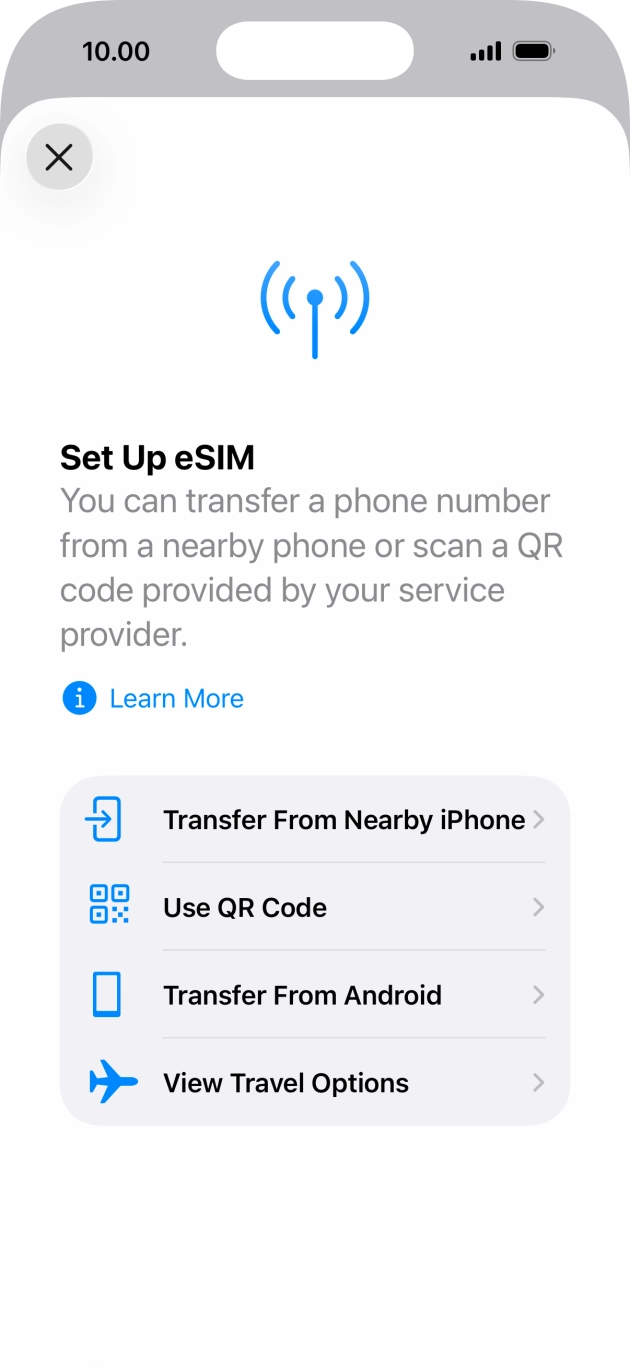 Enlarge screen ↗
For the QR option: Choose Use QR Code to install using your QR code. Screen source ↗ 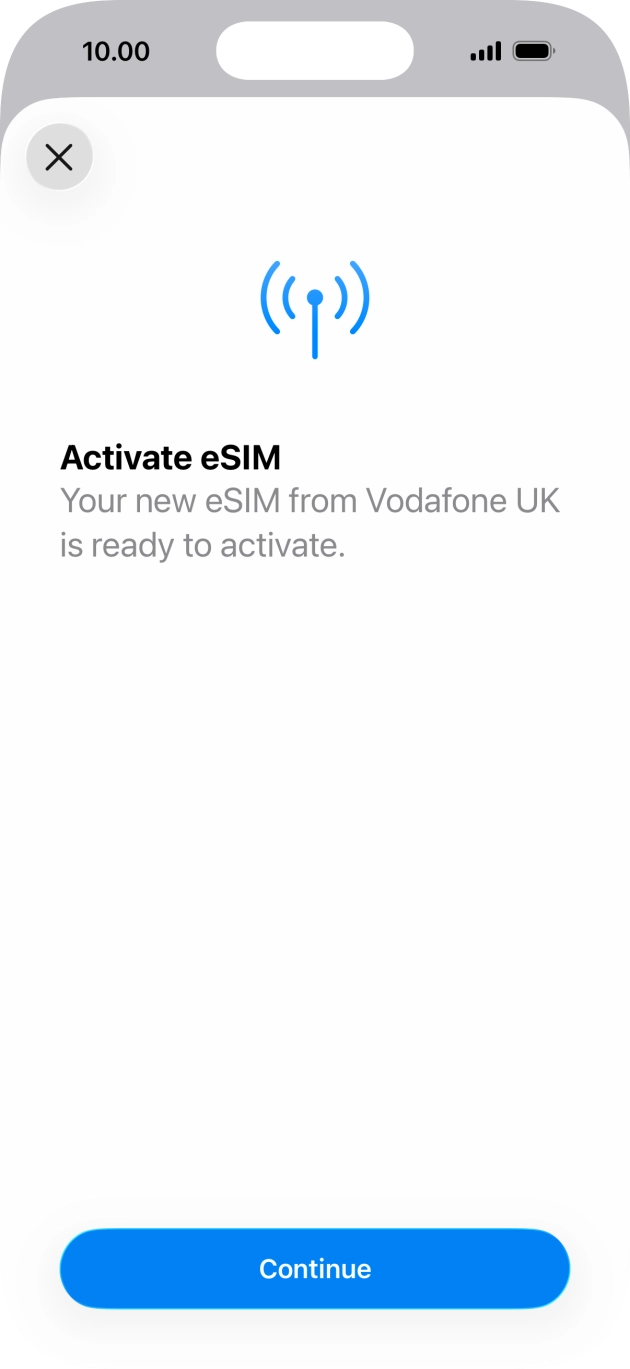 Enlarge screen ↗
After scanning, tap Continue to confirm installation of your eSIM. Screen source ↗ - 03
Give the new line a clear name
For example, “Letisim ”, so you can distinguish it from your home SIM. This is a label on your phone; it does not change the number or plan.
iPhone: Settings → Cellular / Mobile Service → new eSIM → Cellular Plan Label → Custom
Google Pixel / Android: Settings → Network & internet → SIMs → new eSIM → Edit name
Samsung: Settings → Connections → SIM manager → new eSIM → Name
Huawei: SIM management → SIM 2 → your eSIM → Card name. You can keep the existing label if no rename option is shown.
Honor: SIM management → SIM 2 → eSIM name. Rename it if your MagicOS version offers this option.
Xiaomi / Redmi: Manage eSIM → your plan → Change nickname, if available.
Motorola: Open the new eSIM in SIM settings and use the edit-name option if available.
OPPO: Open the installed profile in eSIM settings and change its label if your ColorOS version allows it.
OnePlus: Open the installed eSIM and edit its name if the option is available.
Line name: Letisim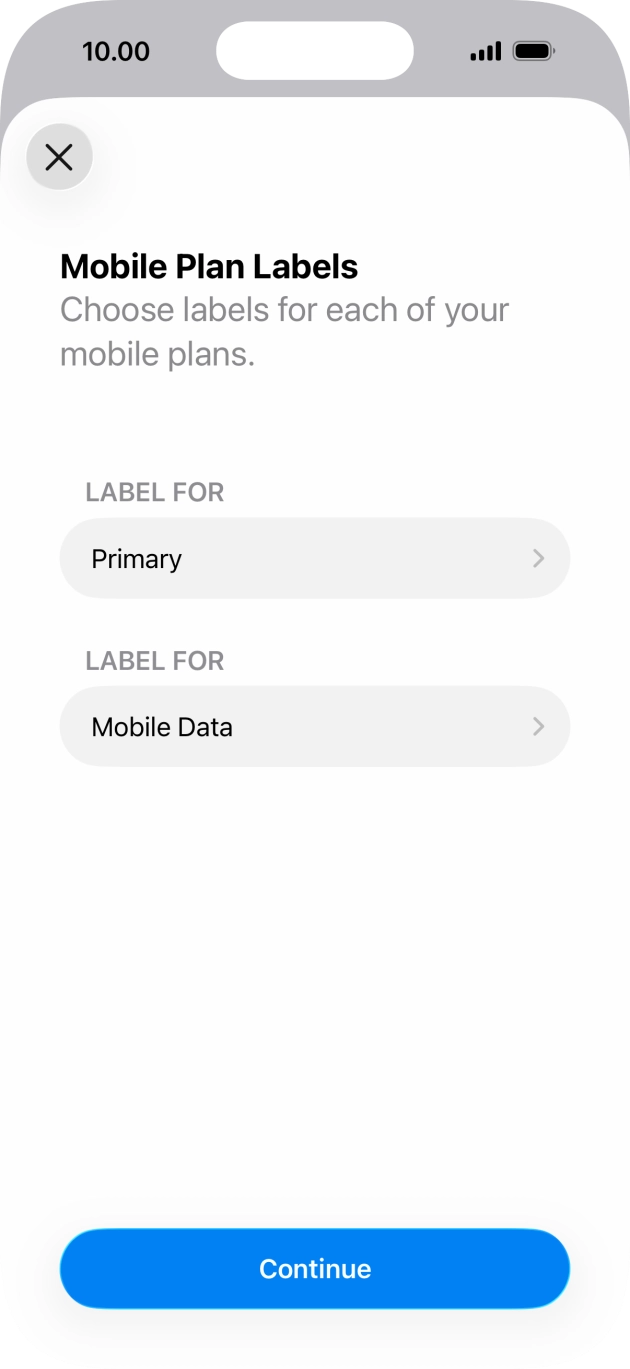 Enlarge screen ↗
Open the new eSIM to edit its name. The example label may differ from yours. Screen source ↗
Installation adds the eSIM to your phone. Choose it for mobile data at your destination. Package validity still follows its own start rule.
At your destination · turn on data
- 04
Choose the eSIM for mobile data
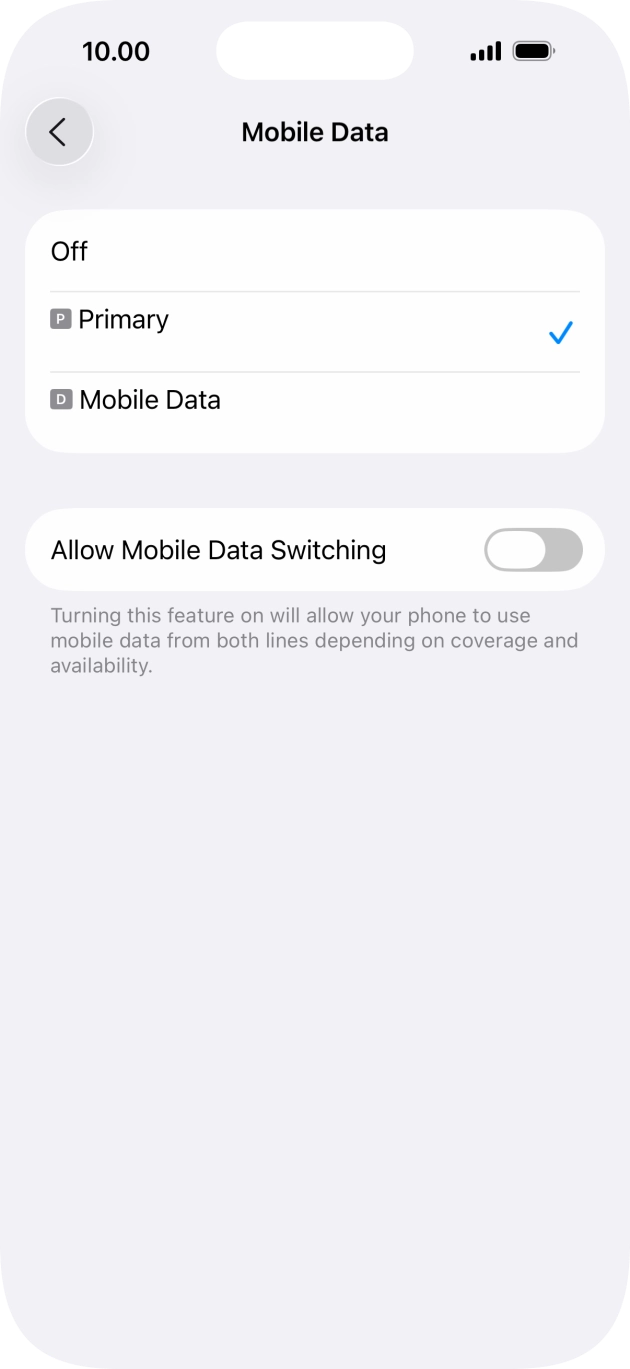
Turn on the new line and select it for mobile data. You can keep your home SIM for calls and texts at its usual rates. Turn off automatic mobile-data switching between SIMs.
iPhone: Settings → Cellular / Mobile Service → Cellular Data → Letisim. Turn off “Allow Cellular Data Switching”.
Google Pixel / Android: Settings → Network & internet → SIMs → Mobile data → Letisim
Samsung: Settings → Connections → SIM manager → Mobile data → Letisim
Huawei: In SIM management, enable the travel eSIM and select it as the default mobile-data SIM. Adding it may disable a physical SIM in slot 2.
Honor: In SIM management, enable the eSIM and choose it for mobile data. Check which physical SIM remains active.
Xiaomi / Redmi: Enable the travel plan in Manage eSIM, then select it for mobile data. Some models use eSIM instead of physical SIM 2.
Motorola: Network & internet → SIM settings: enable the travel eSIM and select it for mobile data.
OPPO: Enable the profile in Mobile network → eSIM, then select it for mobile data. The eSIM may occupy the SIM 2 position.
OnePlus: In Mobile network, enable the travel eSIM and choose it for mobile data. Turn off automatic switching to the other SIM.
 Enlarge screen ↗
Choose your travel eSIM for Mobile data. Keep your home SIM for calls. Screen source ↗ - 05
Check roaming in your package guide
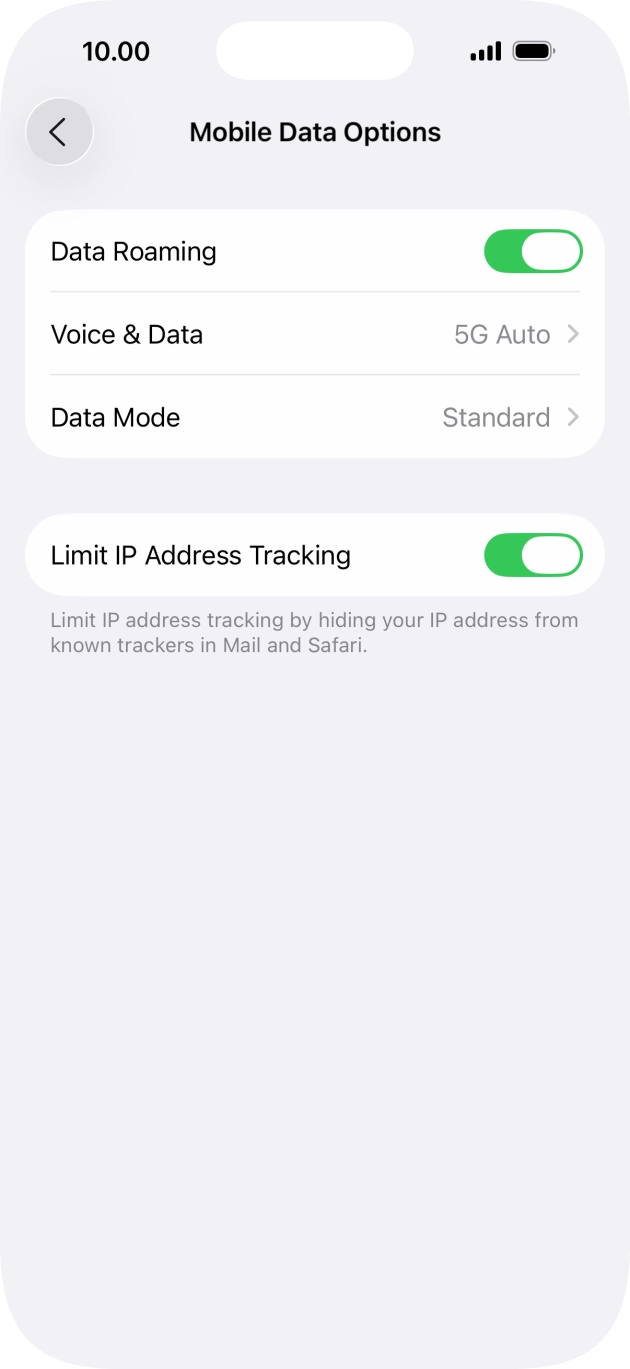
If your eSIM instructions require data roaming, enable it for the Letisim line. Keep data roaming off on your home SIM. If an APN is specified, use the exact value in your own package’s guide.
iPhone: Settings → Cellular / Mobile Service → Letisim → Data Roaming (sometimes under Cellular Data Options)
Google Pixel / Android: Settings → Network & internet → SIMs → Letisim → Roaming
Samsung: First select Letisim for mobile data, then Settings → Connections → Mobile networks → Data roaming
Huawei: Open Mobile network → Mobile data and check data roaming for the travel SIM. Follow the settings in your package guide.
Honor: In the mobile-network settings, open the travel SIM’s data settings and enable roaming only if your package requires it.
Xiaomi / Redmi: In Mobile networks, open the travel SIM’s data-roaming settings. Use the roaming and APN values from your package guide.
Motorola: Open the travel eSIM’s network settings and check Roaming against your package instructions.
OPPO: Open the travel SIM’s mobile-network settings and enable data roaming if required by your package.
OnePlus: Open the travel SIM’s settings and check Data roaming against the instructions for your own package.
 Enlarge screen ↗
Open Data roaming or Roaming for the travel line. Enable it only if your package instructions require it. Screen source ↗ - 06
Check your connection
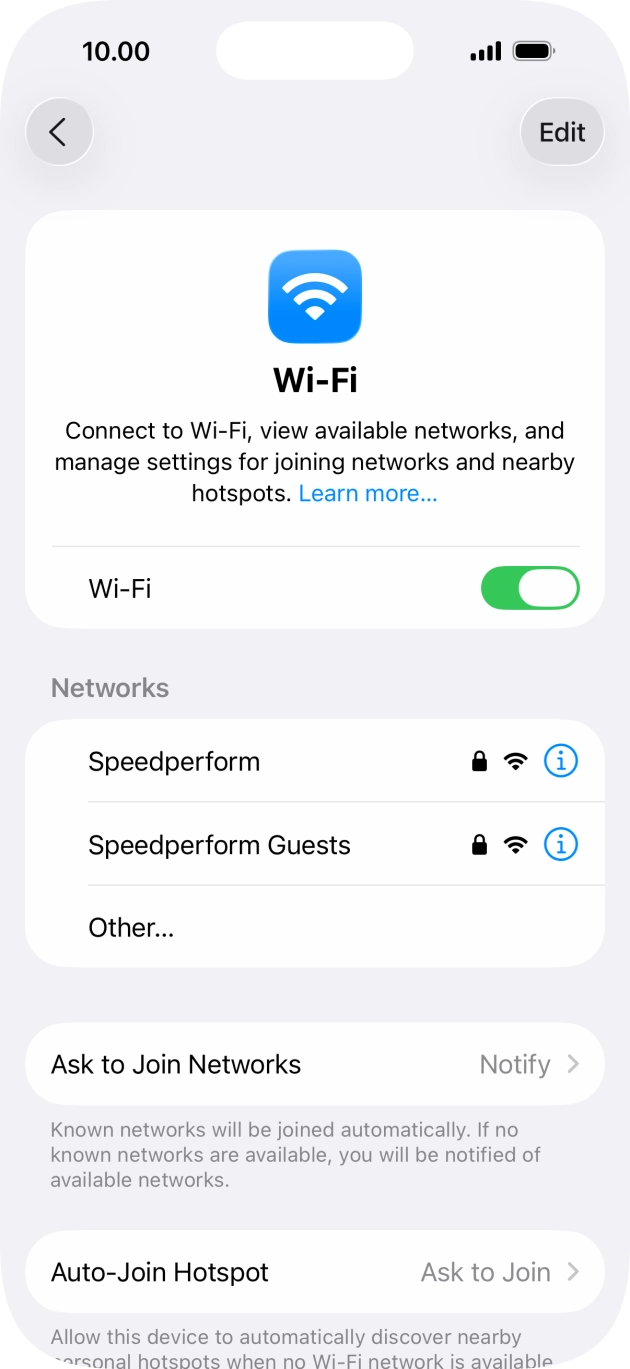
Turn off Wi-Fi and open a map or website. If it loads, mobile data is working. If it does not, turn airplane mode on for about 30 seconds, turn it off and wait for a connection. Recheck the selected line and package settings.
Wi-Fi off → website loads → you are connected
 Enlarge screen ↗
Turn Wi-Fi off using this switch, then open a website or map to check mobile data. Screen source ↗
No second screen for your QR code?
If the scanner has a gallery button, save the QR from your order and choose that image. If your order includes manual installation details, choose Enter details manually and copy the fields exactly. The available methods depend on your phone and eSIM. If neither is available, contact support; do not scan a sample code from this guide or delete an installed eSIM.
Menu names can differ by phone model and system version.