LetisimReloadable
KDDI/AU · NTT DOCOMO · RAKUTEN MOBILE · SOFTBANK5G
DATA1 GB
VALIDITY7 days
VALIDITY STARTS AT FIRST CONNECTIONACTIVATE WITHIN 180 DAYS
$2.80$2.80 · Per GB
Japan · JP
from $1.36 per GB
Compare Japan eSIM packages for Tokyo, Mt. Fuji and Hokkaido. Check the carrier behind each offer, coverage for your route and the package start rule before travel.
50 GB · 30 days for $68.00. Catalog checked 2026-09-10; confirm the total before paying.
A digital SIM you add to your phone over the internet. No plastic card and no visit to a shop.
Use Letisim for maps, taxis and messages while keeping your usual number.
Check my phoneCalls and texts on your home SIM follow your operator’s rates.
Compare data, duration and when validity begins. A top-up label means more data can be added to that package.
Prices checked 2026-09-10. The live catalog is authoritative at checkout.
Prices checked 2026-09-10. The live catalog is authoritative at checkout.
Open all current plans| Data | Validity | Price | Per GB | Choose plan |
|---|---|---|---|---|
| 1 GBKDDI/au · NTT docomo · Rakuten Mobile · SoftBank5GReloadable | 7 daysVALIDITY STARTS AT FIRST CONNECTIONACTIVATE WITHIN 180 DAYS | $2.80 | $2.80 | Choose plan |
| 1 GBReloadable | 30 daysVALIDITY STARTS AT PURCHASE | $10.26 | $10.26 | Choose plan |
| 3 GBKDDI/au · NTT docomo · Rakuten Mobile · SoftBank5GReloadable | 15 daysVALIDITY STARTS AT FIRST CONNECTIONACTIVATE WITHIN 180 DAYS | $6.80 | $2.27 | Choose plan |
| 3 GBReloadable | 30 daysVALIDITY STARTS AT PURCHASE | $7.20 | $2.40 | Choose plan |
| 5 GBReloadable | 30 daysVALIDITY STARTS AT PURCHASE | $10.80 | $2.16 | Choose plan |
| 10 GBReloadable | 30 daysVALIDITY STARTS AT PURCHASE | $18.80 | $1.88 | Choose plan |
| 20 GBReloadable | 30 daysVALIDITY STARTS AT PURCHASE | $32.80 | $1.64 | Choose plan |
| 50 GBReloadable | 30 daysVALIDITY STARTS AT PURCHASE | $68.00 | $1.36 | Choose plan |
| 50 GBKDDI/au · NTT docomo · Rakuten Mobile · SoftBank5GReloadable | 180 daysVALIDITY STARTS AT FIRST CONNECTIONACTIVATE WITHIN 180 DAYS | $112.00 | $2.24 | Choose plan |
| 100 GBReloadable | 30 daysVALIDITY STARTS AT PURCHASE | $164.63 | $1.65 | Choose plan |
| UnlimitedKDDI/au · NTT docomo · Rakuten Mobile · SoftBank5G | 1 dayVALIDITY STARTS AT FIRST CONNECTIONACTIVATE WITHIN 180 DAYS | $6.60 | — | Choose plan |
| UnlimitedKDDI/au · NTT docomo · Rakuten Mobile · SoftBank5G | 3 daysVALIDITY STARTS AT FIRST CONNECTIONACTIVATE WITHIN 180 DAYS | $19.80 | — | Choose plan |
| UnlimitedKDDI/au · NTT docomo · Rakuten Mobile · SoftBank5G | 7 daysVALIDITY STARTS AT FIRST CONNECTIONACTIVATE WITHIN 180 DAYS | $46.20 | — | Choose plan |
| UnlimitedKDDI/au · NTT docomo · Rakuten Mobile · SoftBank5G | 14 daysVALIDITY STARTS AT FIRST CONNECTIONACTIVATE WITHIN 180 DAYS | $92.40 | — | Choose plan |
| UnlimitedKDDI/au · NTT docomo · Rakuten Mobile · SoftBank5G | 30 daysVALIDITY STARTS AT FIRST CONNECTIONACTIVATE WITHIN 180 DAYS | $198.00 | — | Choose plan |
Choose an allowance to see what it could cover. Quality, compression and background activity change actual usage.
With 3 GB, approximately…
Example: 5 MB per photo
Example: a 1-minute Full HD clip ≈ 63 MB
HD example: 3 GB per hour
At standard quality: ≈ 4 hr 17 min
1:1 at 720p: ≈ 1.08 GB per hour
Each result uses the whole allowance for that one activity. The results do not add up: maps, messages and other apps share the same data.
Taking photos or recording video on your phone does not itself use mobile data. Sending, watching or backing them up over the mobile network does.
| Data | Photos · 5 MB | 1-minute clips · 63 MB | HD video · 3 GB/hr | Standard video · 0.7 GB/hr | Video calls · 720p |
|---|---|---|---|---|---|
| 1 GB | ≈ 200 photos | ≈ 15 clips | ≈ 20 min | ≈ 1 hr 25 min | ≈ 55 min |
| 3 GB | ≈ 600 photos | ≈ 47 clips | ≈ 1 hr | ≈ 4 hr 17 min | ≈ 2 hr 46 min |
| 5 GB | ≈ 1,000 photos | ≈ 79 clips | ≈ 1 hr 40 min | ≈ 7 hr 8 min | ≈ 4 hr 37 min |
| 10 GB | ≈ 2,000 photos | ≈ 158 clips | ≈ 3 hr 20 min | ≈ 14 hr 17 min | ≈ 9 hr 15 min |
| 20 GB | ≈ 4,000 photos | ≈ 317 clips | ≈ 6 hr 40 min | ≈ 28 hr 34 min | ≈ 18 hr 31 min |
Planning examples, not guaranteed totals. We use 1 GB = 1,000 MB, round down complete files and minutes, and exclude overhead, retries and background traffic.
Sources checked 2026-09-08
Start with your usual usage. Download maps, your accommodation address and bookings before departure.
Allow extra data if Wi-Fi will be limited. Check whether your phone backs up photos and videos over mobile data.
Check recent data use on your phone and the package’s hotspot rules. Budget separately for video calls and large downloads.
03 / Installation
Your first eSIM? Here is what to open and what to tap.
Check the exact model, regional variant and system version. If Add eSIM or EID is missing, contact support before buying. A brand name alone does not confirm compatibility.
Manufacturer’s instructions · iPhone ↗
Manufacturer’s instructions · Google Pixel / Android ↗
Manufacturer’s instructions · Samsung ↗
Manufacturer’s instructions · Huawei ↗
Manufacturer’s instructions · Honor ↗
Manufacturer’s instructions · Xiaomi / Redmi ↗
Manufacturer’s instructions · Motorola ↗
Manufacturer’s instructions · OPPO ↗
Manufacturer’s instructions · OnePlus ↗
On iOS 26, a Turn On Travel eSIM notification may appear after arrival. Choose the travel line for data and check whether you also want to keep your home line active. If no notification appears, use the manual steps below.
Check when your package starts: at payment, installation or first connection. If it starts on installation, install nearer your trip. Installing later does not postpone a package that started at payment.
These screens show settings on the models named below. Your operator and eSIM labels will differ. Screens retain the source language; each caption translates and identifies the control to use. Tap any image for a closer look.
iPhone 17 · iOS 26 · Screen source ↗
Use a stable Wi-Fi connection or hotspot. Your exact phone model must support eSIM and be unlocked for other operators.
Connect the phone you will use for your eSIM to Wi-Fi. Choose one of the two options below. If this eSIM is already installed, skip to choosing the line for mobile data.
You can add the eSIM by scanning its QR code in Settings. Follow the path below, choose the QR scanner and use the code for your own purchase. If the QR is on this same phone, see the options without a second screen below the guide.
iPhone: Settings → Mobile Service / Cellular → Add eSIM → Use QR Code → Scan QR Code → Continue
Google Pixel / Android: Settings → Network and Internet → SIMs → Add SIM → Set up an eSIM → scan your QR → Set up
Samsung: Settings → Connections → SIM manager → Add eSIM → Scan QR code → Add → Next
Huawei: Settings → Mobile network → SIM management → SIM 2 → Add eSIM → Add eSIM → Scan code → Add this eSIM
Honor: Settings → Mobile network → SIM management → Add eSIM → Add eSIM or transfer from your device → Set up an eSIM → Set up
Xiaomi / Redmi: Settings → Mobile networks → Use eSIM → Manage eSIM → Add eSIM → Add eSIM → scan your QR → confirm download
Motorola: Settings → Network & Internet → SIMs & mobile network → Download new SIM → Set up an eSIM → scan your QR → Set up
OPPO: Settings → Mobile network → SIM & eSIM settings → Add eSIM → Set up an eSIM → scan your QR → Set up
OnePlus: Settings → Mobile network → eSIM → Add eSIM → Add eSIM → Next → scan your QR → Set up
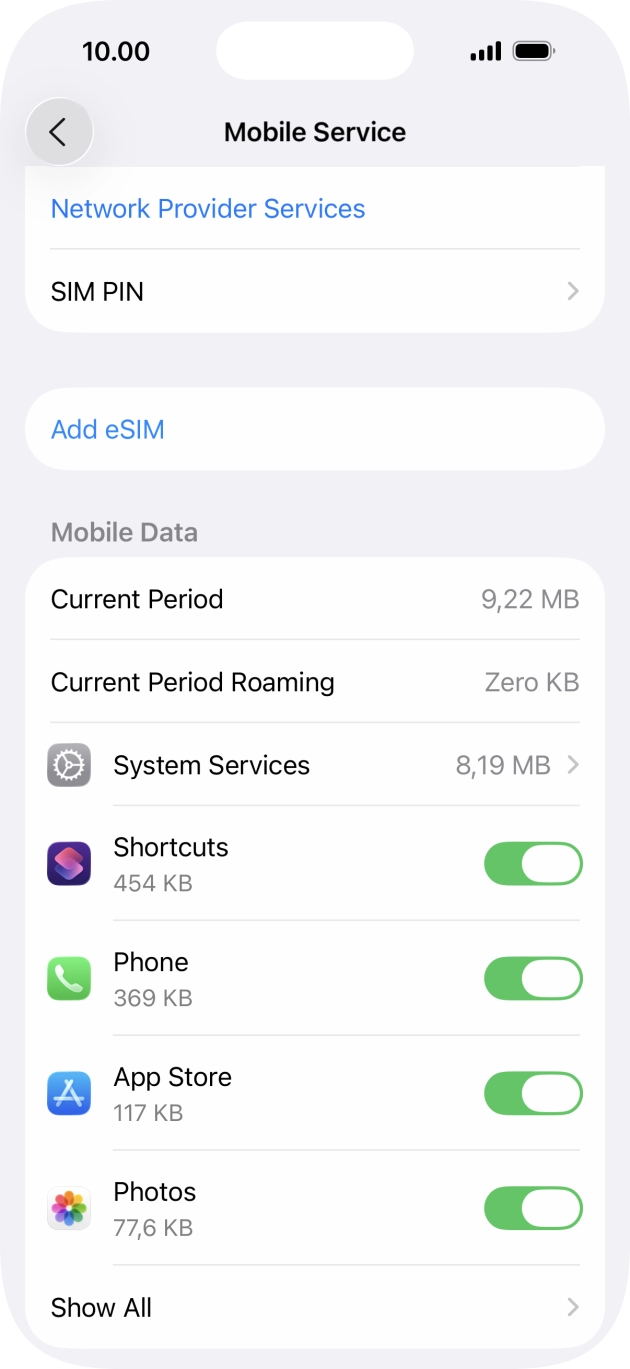 Enlarge screen ↗
The install button or your QR code opens the phone’s system setup. Confirm that you want to add the eSIM, then stay connected to Wi-Fi until the profile finishes downloading. If the phone first asks how to add an eSIM, use your QR code. You do not need to transfer your home SIM from another phone.
Continue / Add / Install / Set up → wait for the eSIM to download
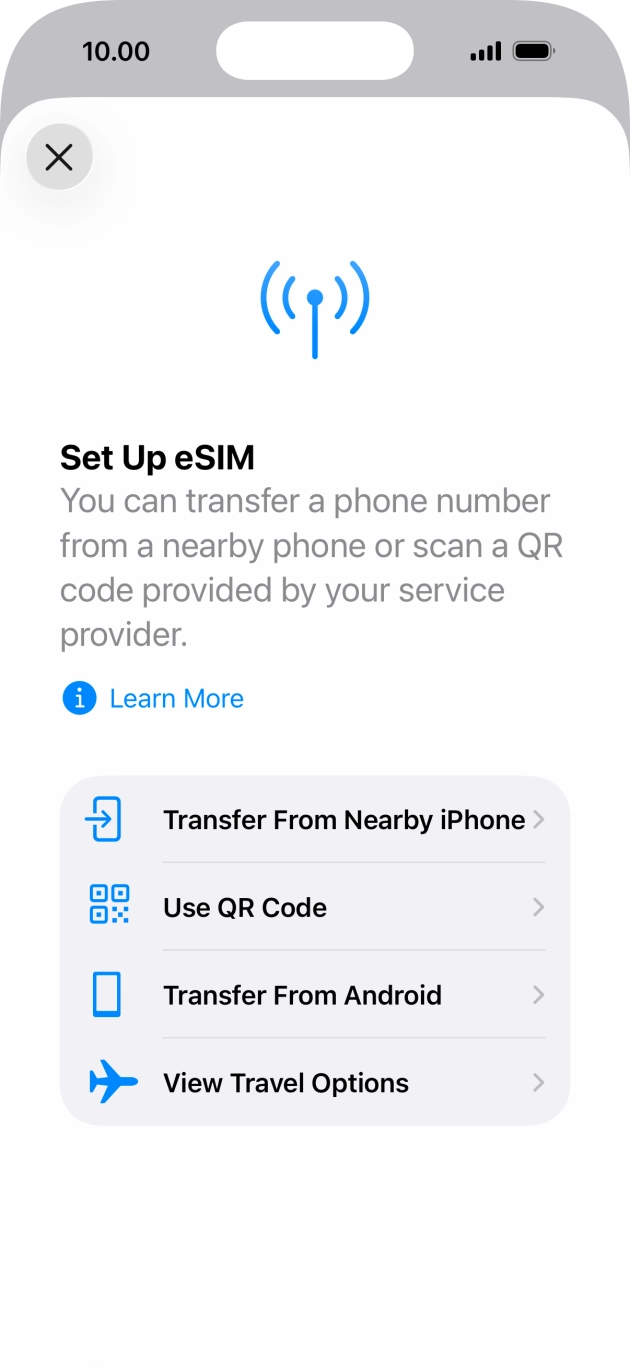 Enlarge screen ↗
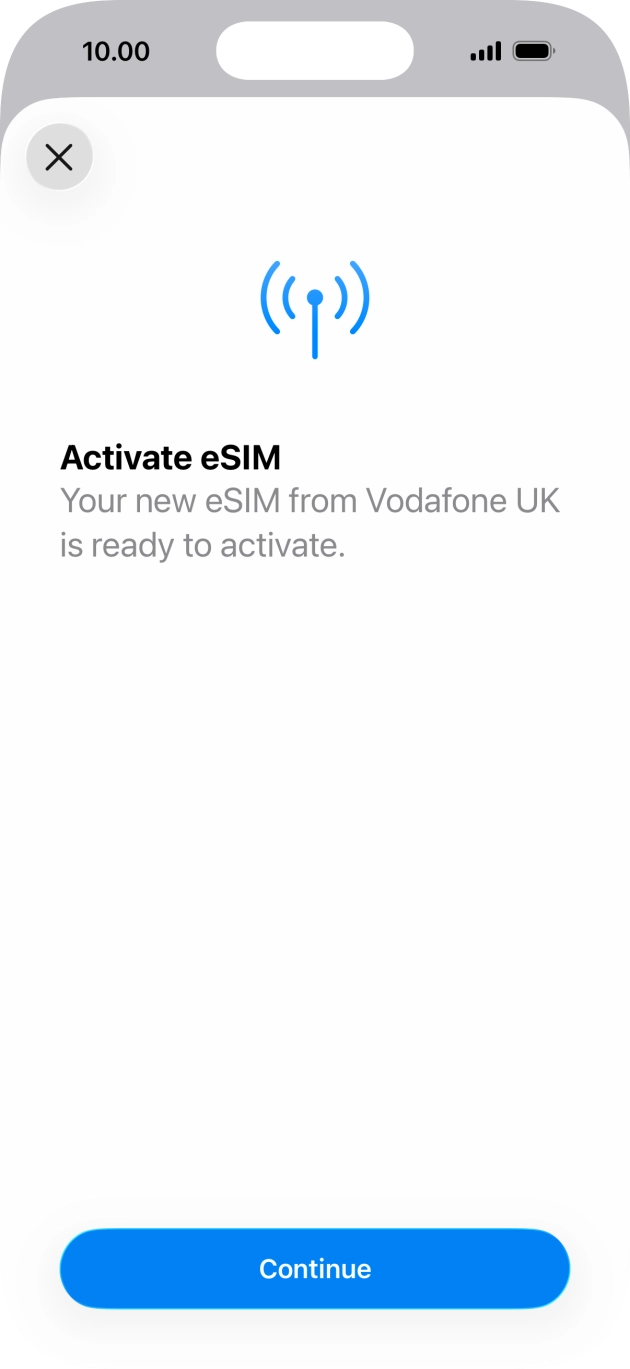 Enlarge screen ↗
For example, “Letisim Japan”, so you can distinguish it from your home SIM. This is a label on your phone; it does not change the number or plan.
iPhone: Settings → Cellular / Mobile Service → new eSIM → Cellular Plan Label → Custom
Google Pixel / Android: Settings → Network & internet → SIMs → new eSIM → Edit name
Samsung: Settings → Connections → SIM manager → new eSIM → Name
Huawei: SIM management → SIM 2 → your eSIM → Card name. You can keep the existing label if no rename option is shown.
Honor: SIM management → SIM 2 → eSIM name. Rename it if your MagicOS version offers this option.
Xiaomi / Redmi: Manage eSIM → your plan → Change nickname, if available.
Motorola: Open the new eSIM in SIM settings and use the edit-name option if available.
OPPO: Open the installed profile in eSIM settings and change its label if your ColorOS version allows it.
OnePlus: Open the installed eSIM and edit its name if the option is available.
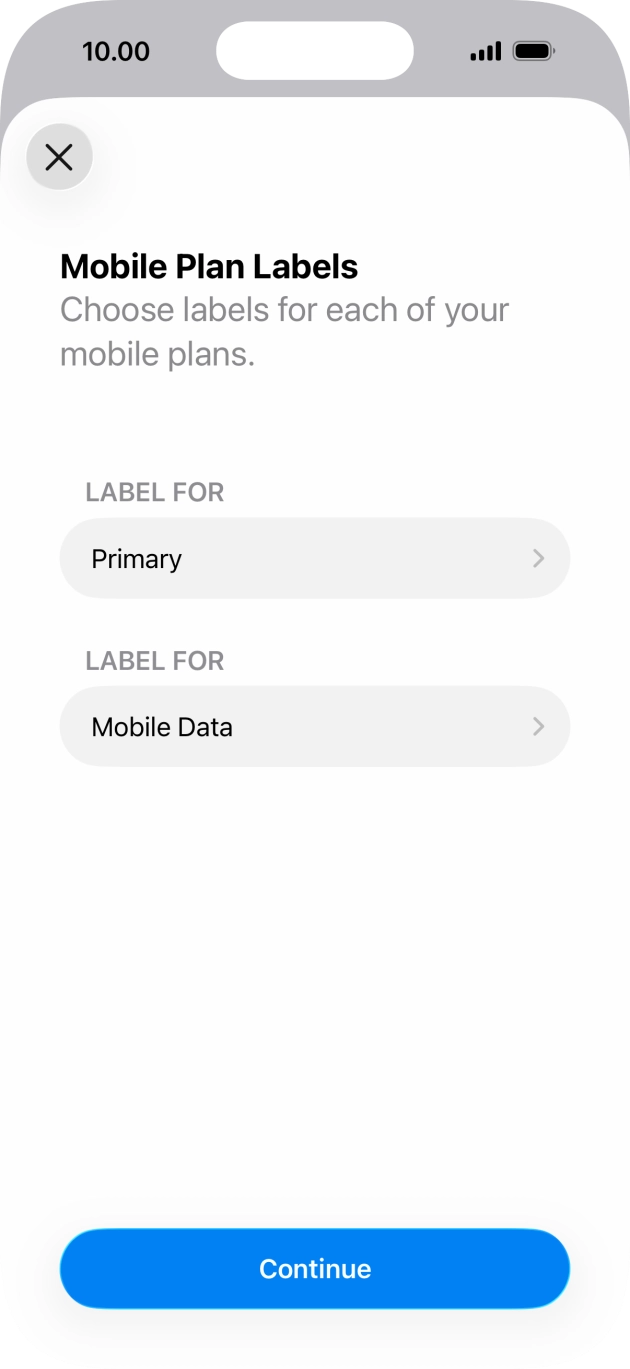 Enlarge screen ↗
Installation adds the eSIM to your phone. Choose it for mobile data at your destination. Package validity still follows its own start rule.
Turn on the new line and select it for mobile data. You can keep your home SIM for calls and texts at its usual rates. Turn off automatic mobile-data switching between SIMs.
iPhone: Settings → Cellular / Mobile Service → Cellular Data → Letisim. Turn off “Allow Cellular Data Switching”.
Google Pixel / Android: Settings → Network & internet → SIMs → Mobile data → Letisim
Samsung: Settings → Connections → SIM manager → Mobile data → Letisim
Huawei: In SIM management, enable the travel eSIM and select it as the default mobile-data SIM. Adding it may disable a physical SIM in slot 2.
Honor: In SIM management, enable the eSIM and choose it for mobile data. Check which physical SIM remains active.
Xiaomi / Redmi: Enable the travel plan in Manage eSIM, then select it for mobile data. Some models use eSIM instead of physical SIM 2.
Motorola: Network & internet → SIM settings: enable the travel eSIM and select it for mobile data.
OPPO: Enable the profile in Mobile network → eSIM, then select it for mobile data. The eSIM may occupy the SIM 2 position.
OnePlus: In Mobile network, enable the travel eSIM and choose it for mobile data. Turn off automatic switching to the other SIM.
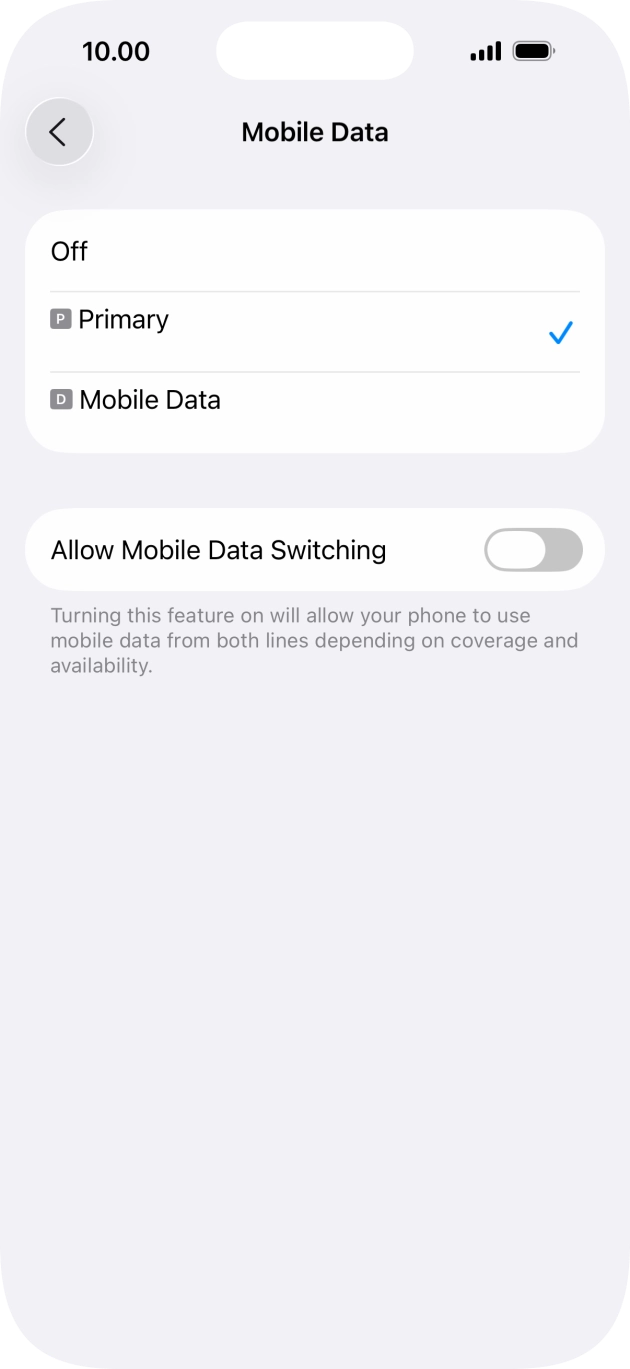 Enlarge screen ↗
If your eSIM instructions require data roaming, enable it for the Letisim line. Keep data roaming off on your home SIM. If an APN is specified, use the exact value in your own package’s guide.
iPhone: Settings → Cellular / Mobile Service → Letisim → Data Roaming (sometimes under Cellular Data Options)
Google Pixel / Android: Settings → Network & internet → SIMs → Letisim → Roaming
Samsung: First select Letisim for mobile data, then Settings → Connections → Mobile networks → Data roaming
Huawei: Open Mobile network → Mobile data and check data roaming for the travel SIM. Follow the settings in your package guide.
Honor: In the mobile-network settings, open the travel SIM’s data settings and enable roaming only if your package requires it.
Xiaomi / Redmi: In Mobile networks, open the travel SIM’s data-roaming settings. Use the roaming and APN values from your package guide.
Motorola: Open the travel eSIM’s network settings and check Roaming against your package instructions.
OPPO: Open the travel SIM’s mobile-network settings and enable data roaming if required by your package.
OnePlus: Open the travel SIM’s settings and check Data roaming against the instructions for your own package.
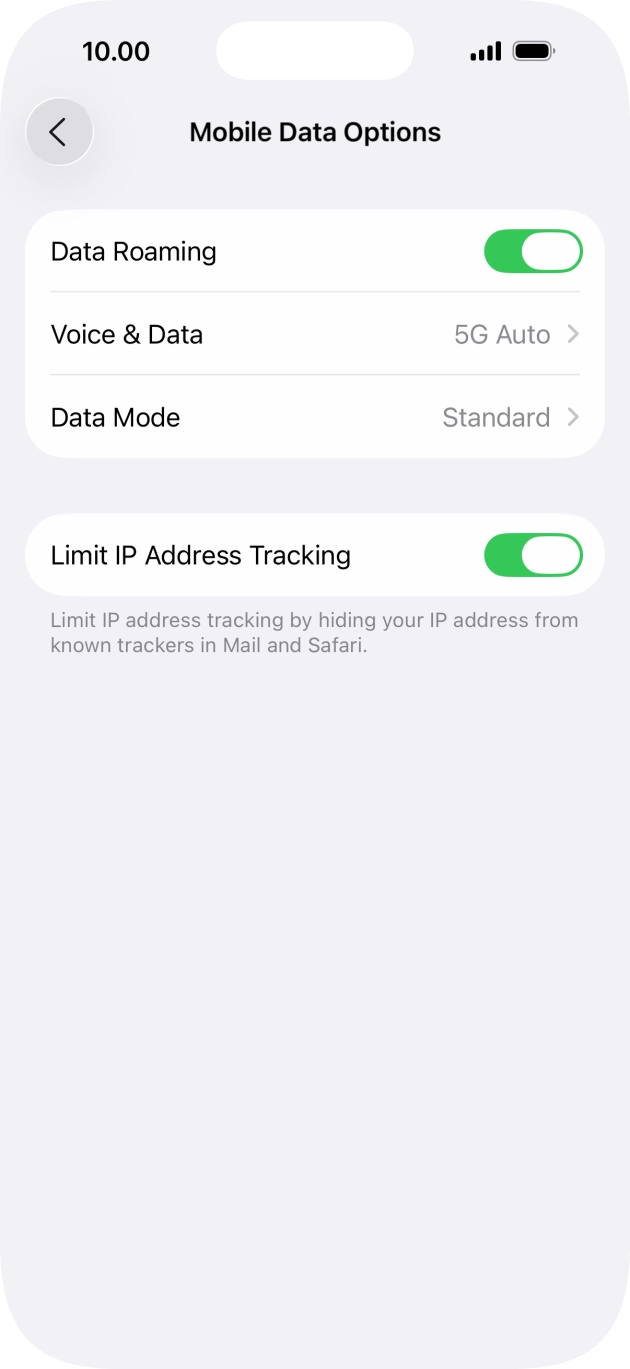 Enlarge screen ↗
Turn off Wi-Fi and open a map or website. If it loads, mobile data is working. If it does not, turn airplane mode on for about 30 seconds, turn it off and wait for a connection. Recheck the selected line and package settings.
Wi-Fi off → website loads → you are connected
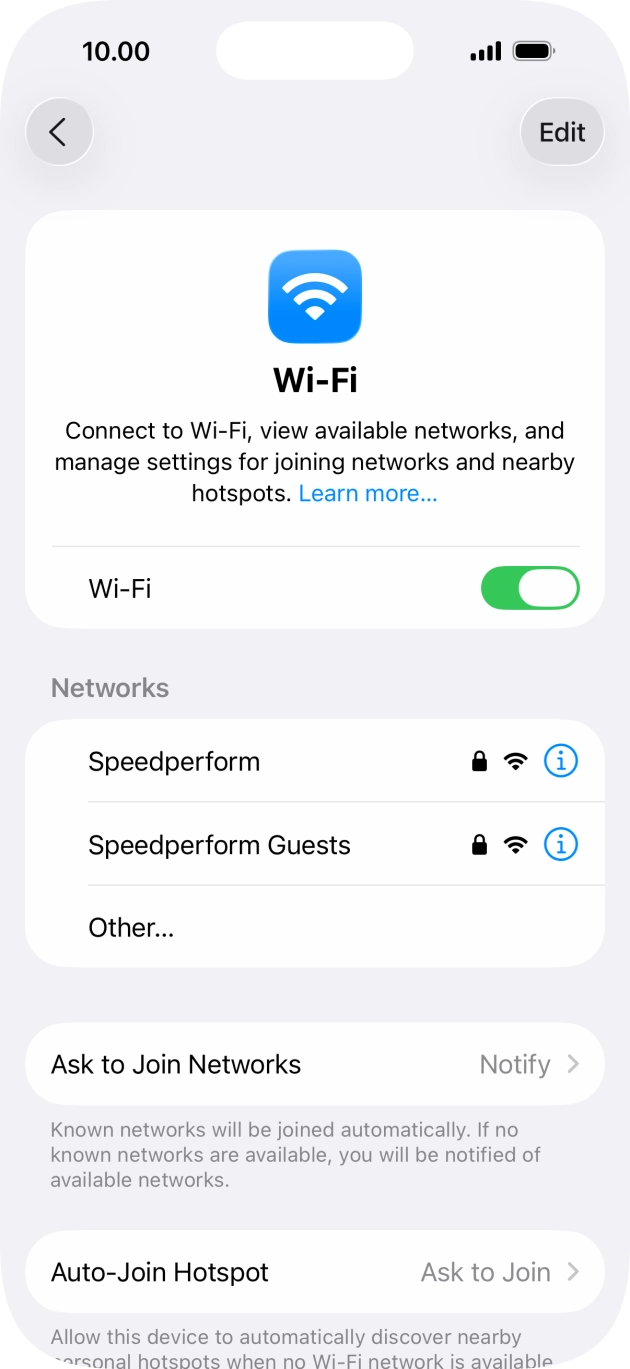 Enlarge screen ↗
If the scanner has a gallery button, save the QR from your order and choose that image. If your order includes manual installation details, choose Enter details manually and copy the fields exactly. The available methods depend on your phone and eSIM. If neither is available, contact support; do not scan a sample code from this guide or delete an installed eSIM.
Menu names can differ by phone model and system version.
04 / Operators
Compare network coverage separately from speed. A national result does not predict reception inside your hotel or along a mountain road.
Japan travel eSIM packages commonly use four nationwide networks: NTT DOCOMO, au, SoftBank and Rakuten Mobile. The package details are the final check, because one offer may use a different network from another offer on the same storefront.
Official service-area page for checking coverage along your route. [1]
Check coverage ↗Official area page for checking specific cities, stations and other stops. [2]
Check coverage ↗Public service-area map; some views depend on service type or handset. [10] [11] [4]
Check coverage ↗Official area page that separates Rakuten coverage from partner area. [3]
Check coverage ↗| Operator | Coverage Experience / 10 | Download · Mbps | Study date |
|---|---|---|---|
| NTT DOCOMO | — | — | — |
| au | — | — | — |
| SoftBank | — | 65.1 | 2026-04[4] |
| Rakuten Mobile | — | — | — |
Coverage Experience is a score, not a percentage of territory. These dated averages are not promised speeds for your connection.
The network in your chosen package is what matters. This country comparison does not mean every plan includes every operator. 5G depends on the package, phone and local coverage.
05 / Coverage
Check the addresses and roads you will actually use. Save maps and booking details before leaving Wi-Fi.
In Tokyo, mobile internet is most useful for station exits, platform changes, indoor navigation and hotel check-in details. Save your hotel address, key tickets and one backup route offline so you can move quickly even during busy transfers. [5] [8] [9]
Trips around Mt. Fuji often combine rail, bus and walking between viewpoints or trail access points. Download maps and booking details before leaving larger transport hubs, especially if your day includes several changes. [6] [8] [9]
For Hokkaido, think about full travel days rather than only city use. Long transfers, weather checks and changing plans make it helpful to keep maps, accommodation details and key confirmations available offline. [7] [8] [9]
Japan · eSIM
Japan travel eSIM packages often run on one of four nationwide networks: NTT DOCOMO, au, SoftBank or Rakuten Mobile. For most travellers, the key decision is not the storefront name but the carrier behind the package. If your trip is mostly Tokyo, any package may look similar at first glance, but station-heavy days, airport transfers and side trips are easier to judge when you check the operator's own coverage page for the places you will actually use.
Package timing matters too. In the catalog, some Japan eSIM packages start validity on first connection, while others start at purchase, so it is worth checking the exact rule before you install too early. For practical travel use, think about your route: Tokyo station changes, train and bus combinations around Mt. Fuji, or long days across Hokkaido. Saved offline maps, hotel details and booking confirmations are helpful alongside mobile data, especially on transfer days.
Japan has several major gateways. Check the IATA code on the ticket before saving a route: NRT and HND both serve Tokyo, but they are not interchangeable.
| Airport | Useful for |
|---|---|
| NRT · Narita | Tokyo |
| HND · Haneda | Tokyo |
| KIX · Kansai | Osaka / Kyoto |
| NGO · Chubu Centrair | Nagoya |
| FUK · Fukuoka | Fukuoka / Hakata |
| CTS · New Chitose | Sapporo / Hokkaido |
| OKA · Naha | Naha / Okinawa |
| Airport | Route | Arrives at | Typical scheduled time | Adult one-way fare |
|---|---|---|---|---|
| NRT | Keisei Skyliner | Nippori / Keisei-Ueno | 36–41 min | ¥2,580 |
| NRT | JR Narita Express (N’EX) | Tokyo / Shinagawa / Shibuya / Shinjuku | ≈53 min (Tokyo) | ¥3,140 (Tokyo); ¥3,330 (Shibuya / Shinjuku) |
| NRT | Airport Bus TYO-NRT | Tokyo Station | ≥65 min | ¥1,500 |
| HND | Keikyu Line | Shinagawa | ≥11 min | ¥330 |
| HND | Tokyo Monorail | Hamamatsucho | ≥13 min | ¥520 |
| HND | Airport Limousine Bus | Tokyo Station / Shinjuku | ≈25–40 min* | ¥1,200–¥1,400 |
These are official fixed-fare examples, not app estimates. Tolls, waiting, changed destinations and other conditions can alter the final total.
| Airport | Arrives at | Daytime example | Late night / early morning |
|---|---|---|---|
| NRT | Chiyoda / Shibuya / Shinjuku | ¥29,000–¥32,500 | 22:00–05:00 |
| HND | Chiyoda / Shibuya / Shinjuku | ¥7,600–¥9,000 | ¥9,000–¥10,700 · 22:00–05:00 |
Snapshot checked 2026-08-21. Fares, timetables, pickup points and disruptions are live data: open the linked operator page again before leaving the terminal.
A practical shortlist, not a popularity ranking. Confirm city coverage and account requirements before relying on an app.
Ride-hailing
Available across Japan; verify the exact area and trip before relying on it.
Needs live data and SMS verification. Dispatch, pickup, app and airport charges may be added to the taxi fare.
Official availability · Checked
Transit and fares
Available across Japan; verify the exact area and trip before relying on it.
Nearby spot search can work offline; current routes, disruptions and some features still need data.
Official availability · Checked
Emergency alerts
Available across Japan; verify the exact area and trip before relying on it.
Enable data and notifications. Also keep 110, 119 and an official help path offline.
Official availability · Checked
Offline maps
Download the map before departure; local address and route detail can vary.
Official availability · Checked
When two Japan eSIM offers look similar, first check which operator stands behind each package. That is the practical way to compare coverage for your airport transfer, city stay and regional side trips. [1] [2] [3] [10] [12]
Some packages start when they first connect, while others start at purchase. Install timing depends on that rule, so read the package details before you set it up too early. [12]
In places such as Tokyo, Mt. Fuji routes and Hokkaido, saved maps, hotel details and booking confirmations make moving around easier. Offline access helps even when you already have mobile data. [5] [6] [7] [8] [9]
06 / FAQ
Choose by route and by the carrier behind the package. Japan travel eSIM offers commonly use NTT DOCOMO, au, SoftBank or Rakuten Mobile, and the package details are the final check because different offers may use different networks. Compare the operator's own coverage page with your itinerary before you buy. [1] [2] [3] [10] [12]
Check the package start rule first. In the catalog, some packages begin validity on first connection and others begin at purchase. If your package starts at purchase, it is better not to activate too early. [12]
Not quite. In Tokyo, the practical need is often navigation through stations, indoor areas and quick transfers. Outside Tokyo, the bigger question is how your package fits longer rail days, bus connections and regional travel such as Mt. Fuji or Hokkaido. [5] [6] [7]
It is very useful if you plan to use trains or combine several types of transport. Japan Travel by NAVITIME offers route planning, transit search and offline spot search, while a general map app can help with basic navigation. [8] [9]