LetisimReloadable
DTAC · TRUEMOVE H5G
DATA1 GB
VALIDITY7 days
VALIDITY STARTS AT FIRST CONNECTIONACTIVATE WITHIN 180 DAYS
$2.80$2.80 · Per GB
Thailand · TH
from $1.64 per GB
Use a Thailand eSIM for maps, chats and bookings from Bangkok to island piers. Compare packages, start rules and public coverage information before your trip.
20 GB · 30 days for $32.80. Catalog checked 2026-09-10; confirm the total before paying.
A digital SIM you add to your phone over the internet. No plastic card and no visit to a shop.
Use Letisim for maps, taxis and messages while keeping your usual number.
Check my phoneCalls and texts on your home SIM follow your operator’s rates.
Compare data, duration and when validity begins. A top-up label means more data can be added to that package.
Prices checked 2026-09-10. The live catalog is authoritative at checkout.
Prices checked 2026-09-10. The live catalog is authoritative at checkout.
Open all current plans| Data | Validity | Price | Per GB | Choose plan |
|---|---|---|---|---|
| 1 GBDTAC · TrueMove H5GReloadable | 7 daysVALIDITY STARTS AT FIRST CONNECTIONACTIVATE WITHIN 180 DAYS | $2.80 | $2.80 | Choose plan |
| 1 GBReloadable | 30 daysVALIDITY STARTS AT PURCHASE | $10.26 | $10.26 | Choose plan |
| 3 GBDTAC · TrueMove H5GReloadable | 15 daysVALIDITY STARTS AT FIRST CONNECTIONACTIVATE WITHIN 180 DAYS | $6.80 | $2.27 | Choose plan |
| 3 GBReloadable | 30 daysVALIDITY STARTS AT PURCHASE | $7.20 | $2.40 | Choose plan |
| 5 GBReloadable | 30 daysVALIDITY STARTS AT PURCHASE | $10.80 | $2.16 | Choose plan |
| 10 GBReloadable | 30 daysVALIDITY STARTS AT PURCHASE | $18.80 | $1.88 | Choose plan |
| 20 GBReloadable | 30 daysVALIDITY STARTS AT PURCHASE | $32.80 | $1.64 | Choose plan |
| 50 GBReloadable | 30 daysVALIDITY STARTS AT PURCHASE | $82.30 | $1.65 | Choose plan |
| 50 GBDTAC · TrueMove H5GReloadable | 180 daysVALIDITY STARTS AT FIRST CONNECTIONACTIVATE WITHIN 180 DAYS | $128.00 | $2.56 | Choose plan |
| 100 GBReloadable | 30 daysVALIDITY STARTS AT PURCHASE | $164.63 | $1.65 | Choose plan |
| UnlimitedDTAC · TrueMove H5G | 1 dayVALIDITY STARTS AT FIRST CONNECTIONACTIVATE WITHIN 180 DAYS | $4.29 | — | Choose plan |
| UnlimitedDTAC · TrueMove H5G | 3 daysVALIDITY STARTS AT FIRST CONNECTIONACTIVATE WITHIN 180 DAYS | $12.87 | — | Choose plan |
| UnlimitedDTAC · TrueMove H5G | 7 daysVALIDITY STARTS AT FIRST CONNECTIONACTIVATE WITHIN 180 DAYS | $30.03 | — | Choose plan |
| UnlimitedDTAC · TrueMove H5G | 14 daysVALIDITY STARTS AT FIRST CONNECTIONACTIVATE WITHIN 180 DAYS | $60.06 | — | Choose plan |
| UnlimitedDTAC · TrueMove H5G | 30 daysVALIDITY STARTS AT FIRST CONNECTIONACTIVATE WITHIN 180 DAYS | $128.70 | — | Choose plan |
Choose an allowance to see what it could cover. Quality, compression and background activity change actual usage.
With 3 GB, approximately…
Example: 5 MB per photo
Example: a 1-minute Full HD clip ≈ 63 MB
HD example: 3 GB per hour
At standard quality: ≈ 4 hr 17 min
1:1 at 720p: ≈ 1.08 GB per hour
Each result uses the whole allowance for that one activity. The results do not add up: maps, messages and other apps share the same data.
Taking photos or recording video on your phone does not itself use mobile data. Sending, watching or backing them up over the mobile network does.
| Data | Photos · 5 MB | 1-minute clips · 63 MB | HD video · 3 GB/hr | Standard video · 0.7 GB/hr | Video calls · 720p |
|---|---|---|---|---|---|
| 1 GB | ≈ 200 photos | ≈ 15 clips | ≈ 20 min | ≈ 1 hr 25 min | ≈ 55 min |
| 3 GB | ≈ 600 photos | ≈ 47 clips | ≈ 1 hr | ≈ 4 hr 17 min | ≈ 2 hr 46 min |
| 5 GB | ≈ 1,000 photos | ≈ 79 clips | ≈ 1 hr 40 min | ≈ 7 hr 8 min | ≈ 4 hr 37 min |
| 10 GB | ≈ 2,000 photos | ≈ 158 clips | ≈ 3 hr 20 min | ≈ 14 hr 17 min | ≈ 9 hr 15 min |
| 20 GB | ≈ 4,000 photos | ≈ 317 clips | ≈ 6 hr 40 min | ≈ 28 hr 34 min | ≈ 18 hr 31 min |
Planning examples, not guaranteed totals. We use 1 GB = 1,000 MB, round down complete files and minutes, and exclude overhead, retries and background traffic.
Sources checked 2026-09-08
Start with your usual usage. Download maps, your accommodation address and bookings before departure.
Allow extra data if Wi-Fi will be limited. Check whether your phone backs up photos and videos over mobile data.
Check recent data use on your phone and the package’s hotspot rules. Budget separately for video calls and large downloads.
03 / Installation
Your first eSIM? Here is what to open and what to tap.
Check the exact model, regional variant and system version. If Add eSIM or EID is missing, contact support before buying. A brand name alone does not confirm compatibility.
Manufacturer’s instructions · iPhone ↗
Manufacturer’s instructions · Google Pixel / Android ↗
Manufacturer’s instructions · Samsung ↗
Manufacturer’s instructions · Huawei ↗
Manufacturer’s instructions · Honor ↗
Manufacturer’s instructions · Xiaomi / Redmi ↗
Manufacturer’s instructions · Motorola ↗
Manufacturer’s instructions · OPPO ↗
Manufacturer’s instructions · OnePlus ↗
On iOS 26, a Turn On Travel eSIM notification may appear after arrival. Choose the travel line for data and check whether you also want to keep your home line active. If no notification appears, use the manual steps below.
Check when your package starts: at payment, installation or first connection. If it starts on installation, install nearer your trip. Installing later does not postpone a package that started at payment.
These screens show settings on the models named below. Your operator and eSIM labels will differ. Screens retain the source language; each caption translates and identifies the control to use. Tap any image for a closer look.
iPhone 17 · iOS 26 · Screen source ↗
Use a stable Wi-Fi connection or hotspot. Your exact phone model must support eSIM and be unlocked for other operators.
Connect the phone you will use for your eSIM to Wi-Fi. Choose one of the two options below. If this eSIM is already installed, skip to choosing the line for mobile data.
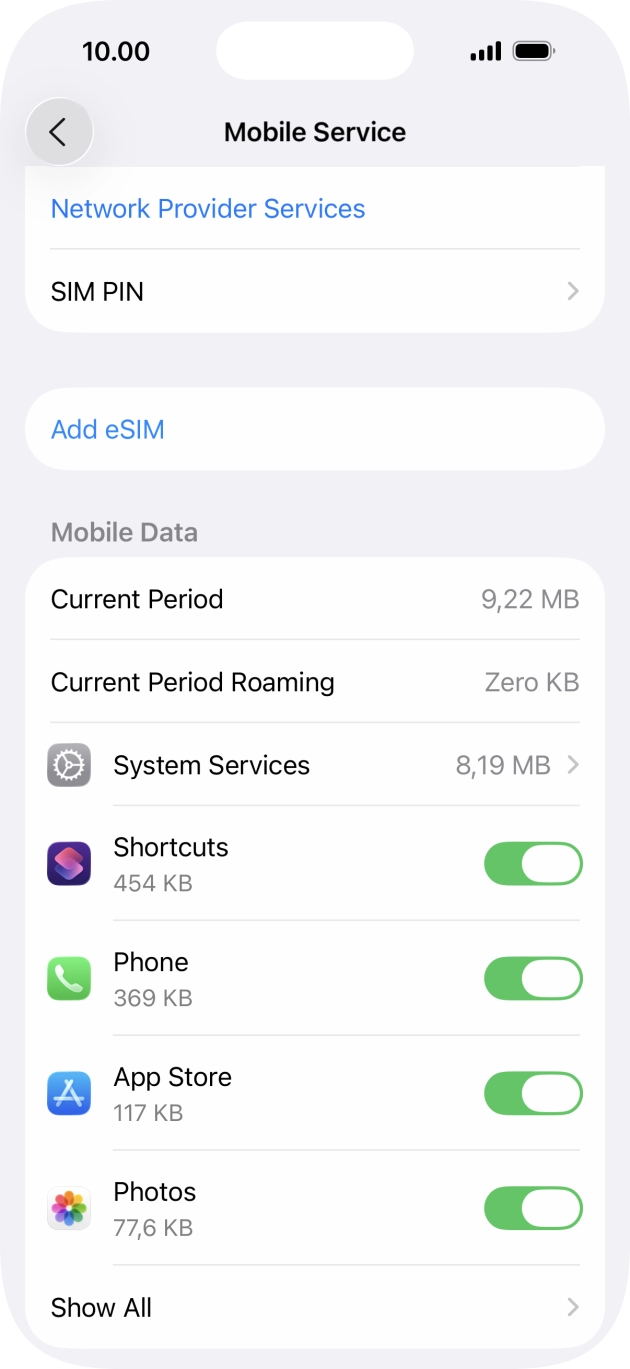
You can add the eSIM by scanning its QR code in Settings. Follow the path below, choose the QR scanner and use the code for your own purchase. If the QR is on this same phone, see the options without a second screen below the guide.
iPhone: Settings → Mobile Service / Cellular → Add eSIM → Use QR Code → Scan QR Code → Continue
Google Pixel / Android: Settings → Network and Internet → SIMs → Add SIM → Set up an eSIM → scan your QR → Set up
Samsung: Settings → Connections → SIM manager → Add eSIM → Scan QR code → Add → Next
Huawei: Settings → Mobile network → SIM management → SIM 2 → Add eSIM → Add eSIM → Scan code → Add this eSIM
Honor: Settings → Mobile network → SIM management → Add eSIM → Add eSIM or transfer from your device → Set up an eSIM → Set up
Xiaomi / Redmi: Settings → Mobile networks → Use eSIM → Manage eSIM → Add eSIM → Add eSIM → scan your QR → confirm download
Motorola: Settings → Network & Internet → SIMs & mobile network → Download new SIM → Set up an eSIM → scan your QR → Set up
OPPO: Settings → Mobile network → SIM & eSIM settings → Add eSIM → Set up an eSIM → scan your QR → Set up
OnePlus: Settings → Mobile network → eSIM → Add eSIM → Add eSIM → Next → scan your QR → Set up
 Enlarge screen ↗
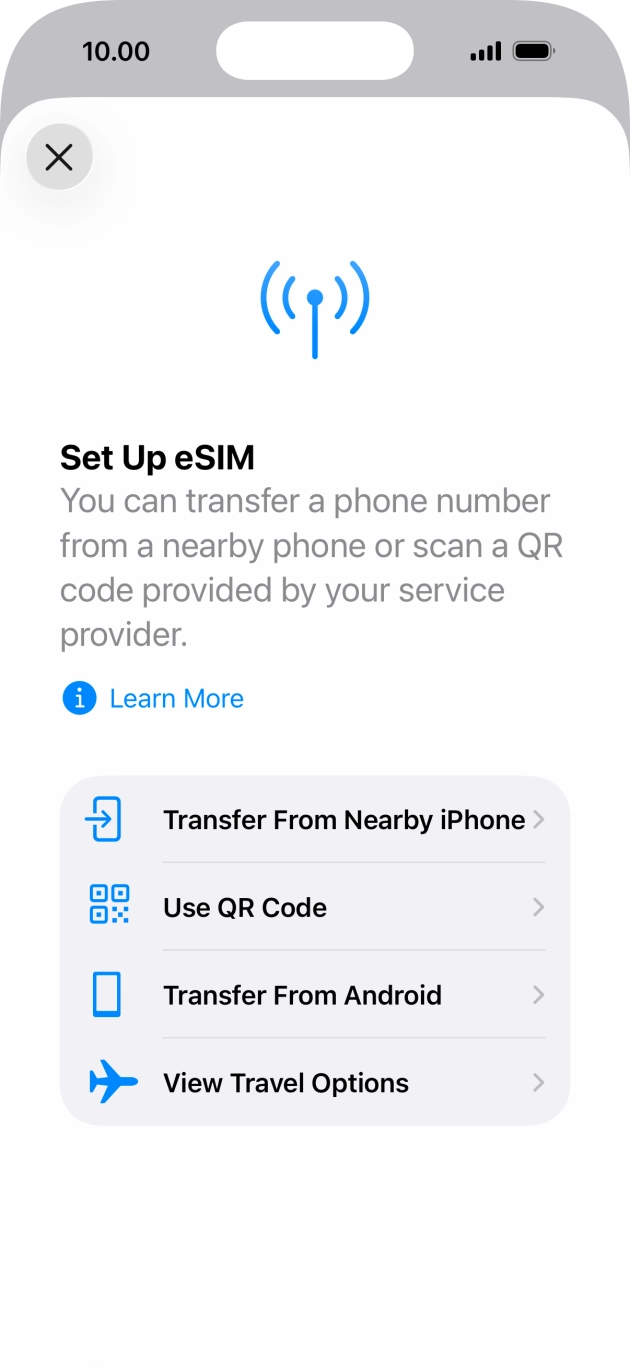
The install button or your QR code opens the phone’s system setup. Confirm that you want to add the eSIM, then stay connected to Wi-Fi until the profile finishes downloading. If the phone first asks how to add an eSIM, use your QR code. You do not need to transfer your home SIM from another phone.
Continue / Add / Install / Set up → wait for the eSIM to download
 Enlarge screen ↗
 Enlarge screen ↗
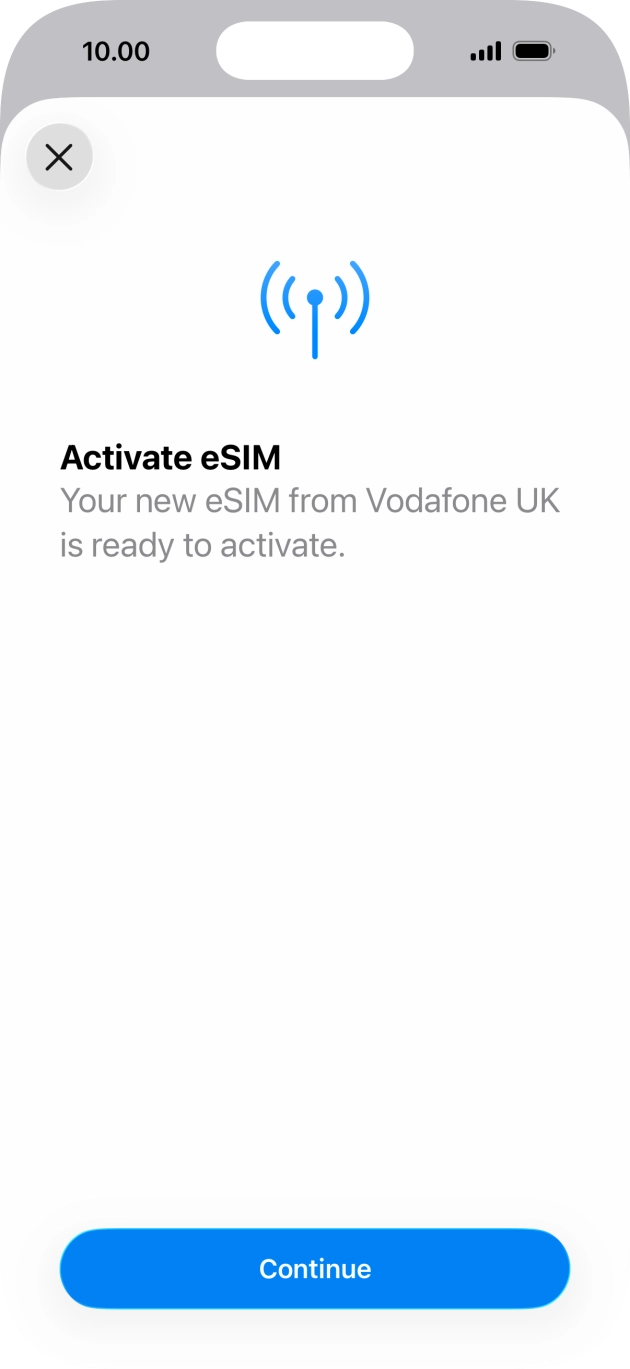
For example, “Letisim Thailand”, so you can distinguish it from your home SIM. This is a label on your phone; it does not change the number or plan.
iPhone: Settings → Cellular / Mobile Service → new eSIM → Cellular Plan Label → Custom
Google Pixel / Android: Settings → Network & internet → SIMs → new eSIM → Edit name
Samsung: Settings → Connections → SIM manager → new eSIM → Name
Huawei: SIM management → SIM 2 → your eSIM → Card name. You can keep the existing label if no rename option is shown.
Honor: SIM management → SIM 2 → eSIM name. Rename it if your MagicOS version offers this option.
Xiaomi / Redmi: Manage eSIM → your plan → Change nickname, if available.
Motorola: Open the new eSIM in SIM settings and use the edit-name option if available.
OPPO: Open the installed profile in eSIM settings and change its label if your ColorOS version allows it.
OnePlus: Open the installed eSIM and edit its name if the option is available.
 Enlarge screen ↗
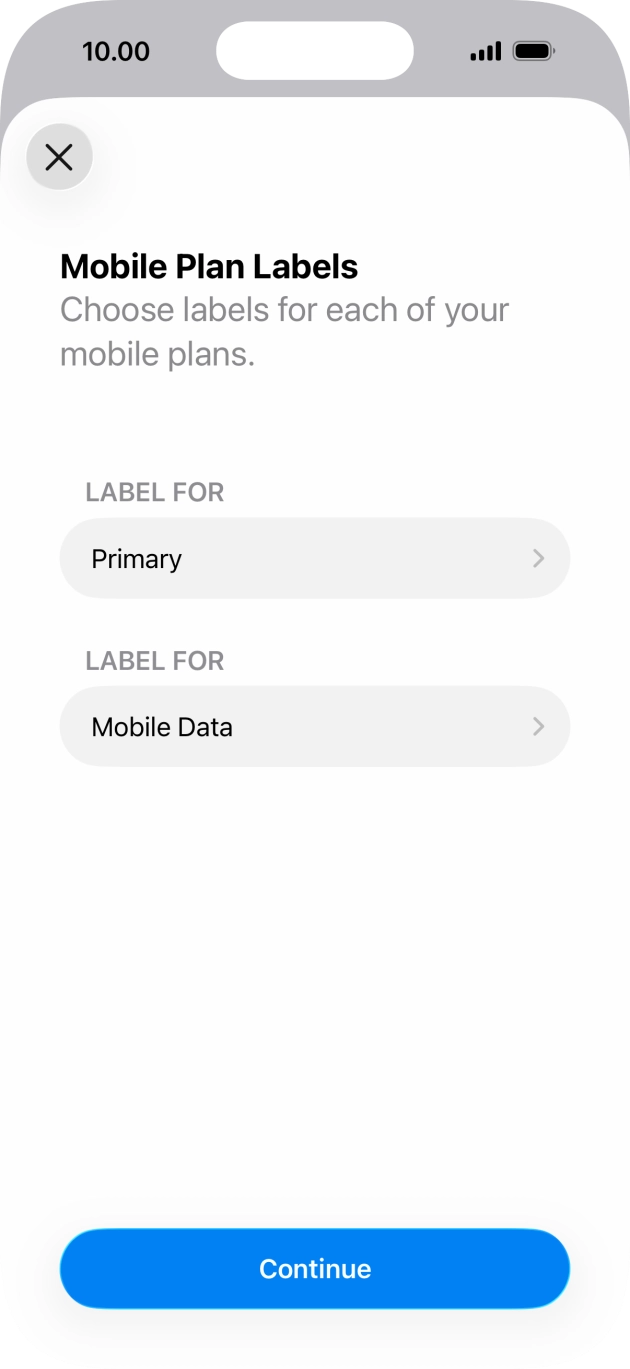
Installation adds the eSIM to your phone. Choose it for mobile data at your destination. Package validity still follows its own start rule.
Turn on the new line and select it for mobile data. You can keep your home SIM for calls and texts at its usual rates. Turn off automatic mobile-data switching between SIMs.
iPhone: Settings → Cellular / Mobile Service → Cellular Data → Letisim. Turn off “Allow Cellular Data Switching”.
Google Pixel / Android: Settings → Network & internet → SIMs → Mobile data → Letisim
Samsung: Settings → Connections → SIM manager → Mobile data → Letisim
Huawei: In SIM management, enable the travel eSIM and select it as the default mobile-data SIM. Adding it may disable a physical SIM in slot 2.
Honor: In SIM management, enable the eSIM and choose it for mobile data. Check which physical SIM remains active.
Xiaomi / Redmi: Enable the travel plan in Manage eSIM, then select it for mobile data. Some models use eSIM instead of physical SIM 2.
Motorola: Network & internet → SIM settings: enable the travel eSIM and select it for mobile data.
OPPO: Enable the profile in Mobile network → eSIM, then select it for mobile data. The eSIM may occupy the SIM 2 position.
OnePlus: In Mobile network, enable the travel eSIM and choose it for mobile data. Turn off automatic switching to the other SIM.
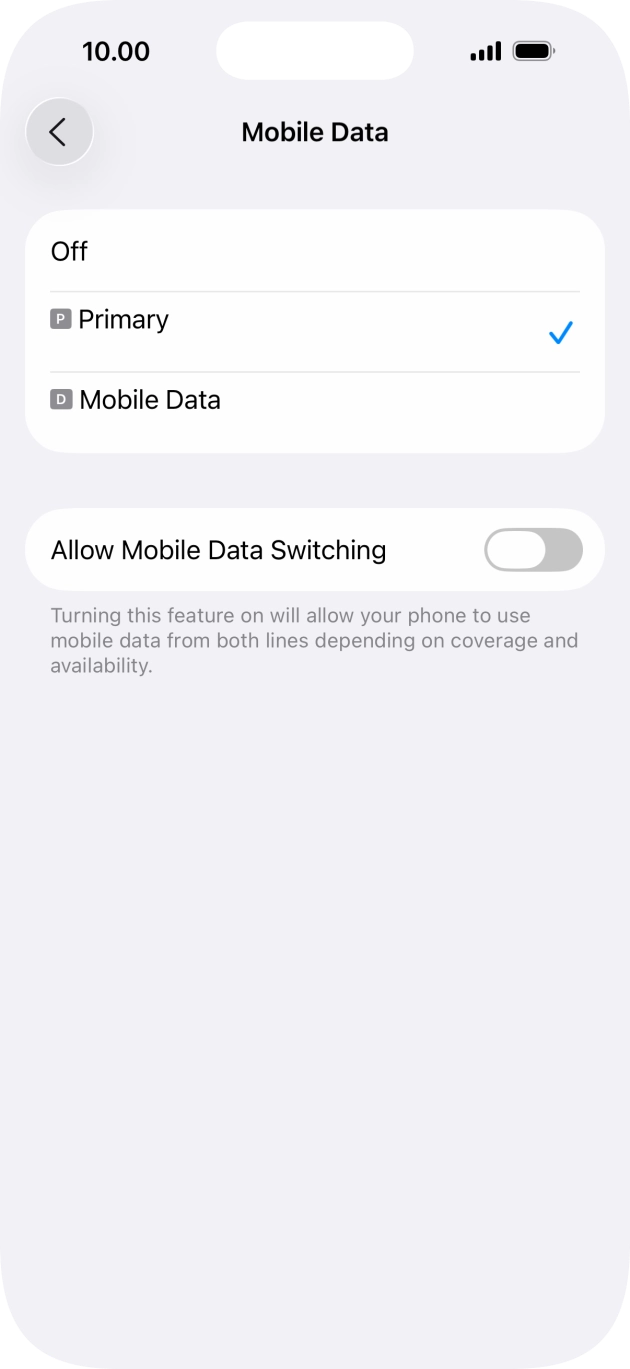 Enlarge screen ↗
If your eSIM instructions require data roaming, enable it for the Letisim line. Keep data roaming off on your home SIM. If an APN is specified, use the exact value in your own package’s guide.
iPhone: Settings → Cellular / Mobile Service → Letisim → Data Roaming (sometimes under Cellular Data Options)
Google Pixel / Android: Settings → Network & internet → SIMs → Letisim → Roaming
Samsung: First select Letisim for mobile data, then Settings → Connections → Mobile networks → Data roaming
Huawei: Open Mobile network → Mobile data and check data roaming for the travel SIM. Follow the settings in your package guide.
Honor: In the mobile-network settings, open the travel SIM’s data settings and enable roaming only if your package requires it.
Xiaomi / Redmi: In Mobile networks, open the travel SIM’s data-roaming settings. Use the roaming and APN values from your package guide.
Motorola: Open the travel eSIM’s network settings and check Roaming against your package instructions.
OPPO: Open the travel SIM’s mobile-network settings and enable data roaming if required by your package.
OnePlus: Open the travel SIM’s settings and check Data roaming against the instructions for your own package.
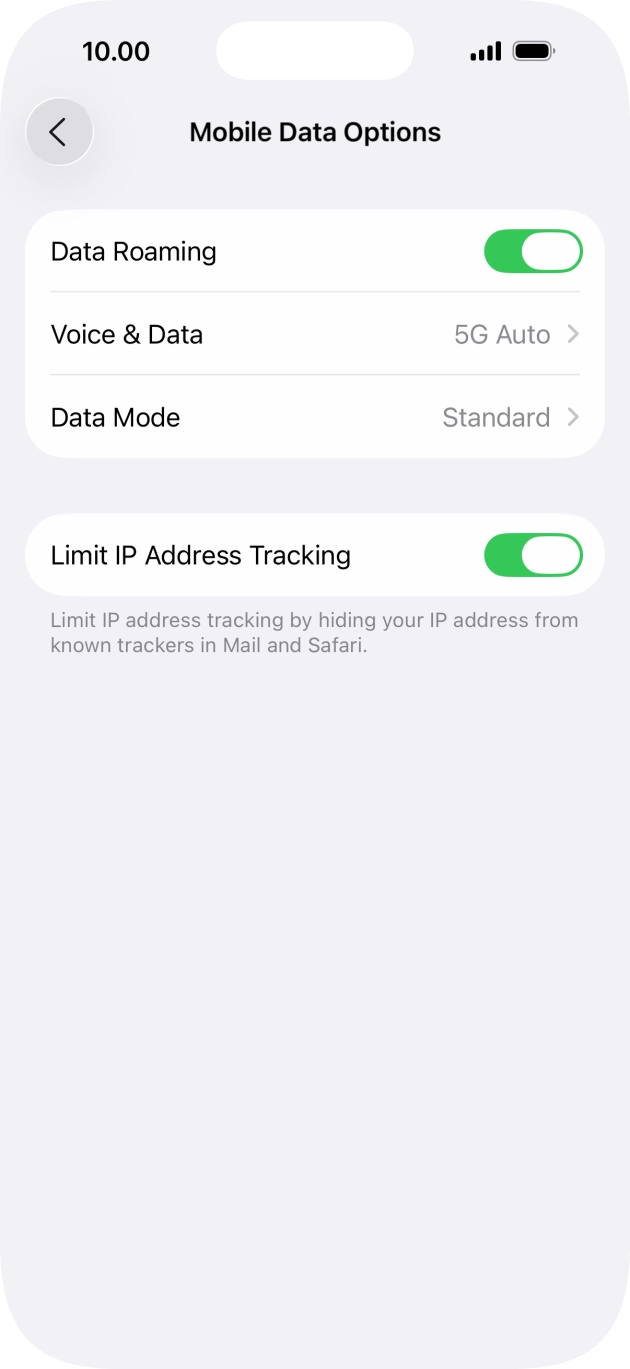 Enlarge screen ↗
Turn off Wi-Fi and open a map or website. If it loads, mobile data is working. If it does not, turn airplane mode on for about 30 seconds, turn it off and wait for a connection. Recheck the selected line and package settings.
Wi-Fi off → website loads → you are connected
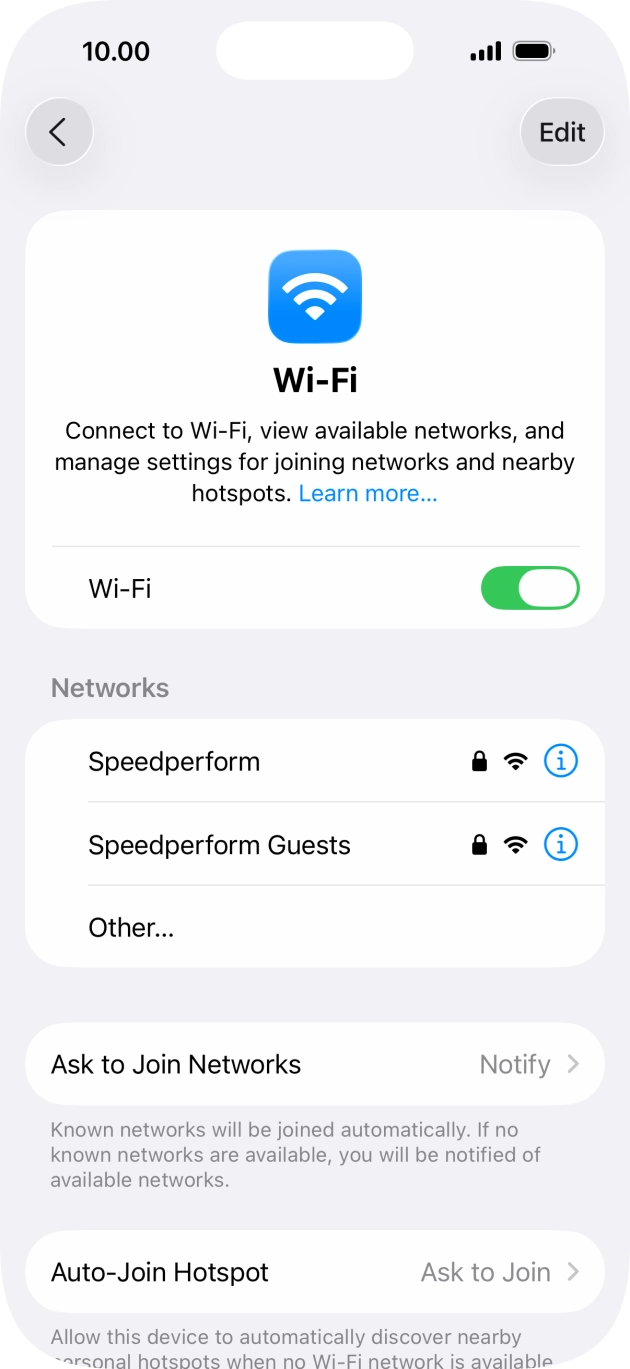 Enlarge screen ↗
If the scanner has a gallery button, save the QR from your order and choose that image. If your order includes manual installation details, choose Enter details manually and copy the fields exactly. The available methods depend on your phone and eSIM. If neither is available, contact support; do not scan a sample code from this guide or delete an installed eSIM.
Menu names can differ by phone model and system version.
04 / Operators
Compare network coverage separately from speed. A national result does not predict reception inside your hotel or along a mountain road.
This comparison covers AIS, True and NT. Check which network is listed in your chosen eSIM package, then compare coverage for the places on your itinerary.
AIS provides a public mobile-network page with coverage-related tools on its site. [1] [2] [3]
Check coverage ↗Ask True about mobile coverage at your accommodation and along your route. Check the network listed in the eSIM package before purchase. [1] [4]
Official website ↗Ask NT about mobile coverage at your accommodation and along your route. Check the network listed in the eSIM package before purchase. [1] [5]
Official website ↗The network in your chosen package is what matters. This country comparison does not mean every plan includes every operator. 5G depends on the package, phone and local coverage.
05 / Coverage
Check the addresses and roads you will actually use. Save maps and booking details before leaving Wi-Fi.
If your trip starts in Bangkok, complete eSIM setup before long transfers across the city. Test maps and messaging near your hotel and along the BTS or MRT route you will actually use; malls, stations and other indoor stops matter more than a city-wide assumption. [2] [6] [7]
Before the mainland-to-island transfer, save ferry details, your hotel address and offline maps. A downloaded map is especially useful on travel day and after arrival at smaller piers or beach roads. [6]
Hat Yai is practical as a transit point for rail, airport and onward southern travel. Keep booking confirmations and maps handy if you are switching between train, minivan and flight on the same day. [7] [8]
Before leaving the city, download park maps, hotel pins and return-transport details. On national-park itineraries, saved navigation and screenshots can matter as much as live data. [6] [8]
Thailand · eSIM
Thailand is straightforward for a travel eSIM when you plan around the places you will actually use, not just the outline of the country on a map. For most visitors, the important moments are the first airport transfer, hotel check-in, station platforms, ferry piers and day-trip navigation. Public operator information exists, but it is not equally detailed for every network, so it is smart to check your real stops and keep key trip details saved offline.
When comparing packages, focus on three practical points: which network the package includes, when validity starts, and how much traffic fits your trip length and app use. Some Thailand packages start on first connection while others start from purchase, so early installation helps only when the package rule matches your timing. If your route mixes Bangkok, island transfers and park drives, downloaded maps and saved tickets are useful alongside live mobile internet.
Official Tourism Authority of Thailand app for trip ideas and visitor information. [6]
Official State Railway of Thailand app for checking and booking train travel. [7]
Official tourist-police app for visitor assistance and incident reporting. [8]
Thailand eSIM packages do not all start the same way. Some begin on first connection, while others start from purchase, so install early only if that rule suits your trip. The package screen is the final reference. [9]
Where public mobile coverage information is available, check the places you will really use: your hotel area, station, ferry point or road transfer. If a public map is not available, keep offline maps and downloaded tickets ready. [2] [3] [4] [5] [7]
If you need a local number, calls or SMS, confirm that on the package screen before purchase instead of assuming every eSIM includes the same services. [9]
06 / FAQ
Thailand's main public mobile-network names are AIS, True and NT. On the package page, follow the listed included network and package details, because not every eSIM uses the same supplier or product label. [1] [9]
You can install before the trip, but check the package rule first. Some packages start on first connection, while others start from purchase, so the package page should decide your timing. [9]
Choose based on trip length and how you use maps, messaging, video, downloads or tethering. Ferry days, transfers and shared navigation can increase usage, while downloaded offline maps reduce dependence on live data. [9] [6] [7]
Not necessarily. If your phone supports eSIM and the package details fit your trip, you can avoid depending on an airport or city shop. The key checks are the included network and when validity starts. [4] [9]
No. AIS publishes mobile-network information; for True and NT, check current coverage with the operator for the places you will visit. A store finder does not show mobile reception. Save maps before island transfers, mountain drives or longer journeys. [2] [3] [4] [5]