LetisimReloadable
DIGICEL4G
DATA1 GB
VALIDITY7 days
VALIDITY STARTS AT FIRST CONNECTIONACTIVATE WITHIN 180 DAYS
$24.40$24.40 · Per GB
British Virgin Islands · VG
from $18.28 per GB
Stay online for maps, taxis and messages across the British Virgin Islands with an eSIM you can set up before arrival.
20 GB · 30 days for $365.44. Catalog checked 2026-09-10; confirm the total before paying.
A digital SIM you add to your phone over the internet. No plastic card and no visit to a shop.
Use Letisim for maps, taxis and messages while keeping your usual number.
Check my phoneCalls and texts on your home SIM follow your operator’s rates.
Compare data, duration and when validity begins. A top-up label means more data can be added to that package.
Prices checked 2026-09-10. The live catalog is authoritative at checkout.
Prices checked 2026-09-10. The live catalog is authoritative at checkout.
Open all current plans| Data | Validity | Price | Per GB | Choose plan |
|---|---|---|---|---|
| 1 GBDigicel4GReloadable | 7 daysVALIDITY STARTS AT FIRST CONNECTIONACTIVATE WITHIN 180 DAYS | $24.40 | $24.40 | Choose plan |
| 1 GBReloadable | 30 daysVALIDITY STARTS AT PURCHASE | $28.78 | $28.78 | Choose plan |
| 3 GBDigicel4GReloadable | 15 daysVALIDITY STARTS AT FIRST CONNECTIONACTIVATE WITHIN 180 DAYS | $65.44 | $21.82 | Choose plan |
| 3 GBReloadable | 30 daysVALIDITY STARTS AT PURCHASE | $69.60 | $23.20 | Choose plan |
| 5 GBReloadable | 30 daysVALIDITY STARTS AT PURCHASE | $108.80 | $21.76 | Choose plan |
| 10 GBReloadable | 30 daysVALIDITY STARTS AT PURCHASE | $199.08 | $19.91 | Choose plan |
| 20 GBReloadable | 30 daysVALIDITY STARTS AT PURCHASE | $365.44 | $18.28 | Choose plan |
| 50 GBReloadable | 30 daysVALIDITY STARTS AT PURCHASE | $1,008.53 | $20.18 | Choose plan |
Choose an allowance to see what it could cover. Quality, compression and background activity change actual usage.
With 3 GB, approximately…
Example: 5 MB per photo
Example: a 1-minute Full HD clip ≈ 63 MB
HD example: 3 GB per hour
At standard quality: ≈ 4 hr 17 min
1:1 at 720p: ≈ 1.08 GB per hour
Each result uses the whole allowance for that one activity. The results do not add up: maps, messages and other apps share the same data.
Taking photos or recording video on your phone does not itself use mobile data. Sending, watching or backing them up over the mobile network does.
| Data | Photos · 5 MB | 1-minute clips · 63 MB | HD video · 3 GB/hr | Standard video · 0.7 GB/hr | Video calls · 720p |
|---|---|---|---|---|---|
| 1 GB | ≈ 200 photos | ≈ 15 clips | ≈ 20 min | ≈ 1 hr 25 min | ≈ 55 min |
| 3 GB | ≈ 600 photos | ≈ 47 clips | ≈ 1 hr | ≈ 4 hr 17 min | ≈ 2 hr 46 min |
| 5 GB | ≈ 1,000 photos | ≈ 79 clips | ≈ 1 hr 40 min | ≈ 7 hr 8 min | ≈ 4 hr 37 min |
| 10 GB | ≈ 2,000 photos | ≈ 158 clips | ≈ 3 hr 20 min | ≈ 14 hr 17 min | ≈ 9 hr 15 min |
| 20 GB | ≈ 4,000 photos | ≈ 317 clips | ≈ 6 hr 40 min | ≈ 28 hr 34 min | ≈ 18 hr 31 min |
Planning examples, not guaranteed totals. We use 1 GB = 1,000 MB, round down complete files and minutes, and exclude overhead, retries and background traffic.
Sources checked 2026-09-08
Start with your usual usage. Download maps, your accommodation address and bookings before departure.
Allow extra data if Wi-Fi will be limited. Check whether your phone backs up photos and videos over mobile data.
Check recent data use on your phone and the package’s hotspot rules. Budget separately for video calls and large downloads.
03 / Installation
Your first eSIM? Here is what to open and what to tap.
Check the exact model, regional variant and system version. If Add eSIM or EID is missing, contact support before buying. A brand name alone does not confirm compatibility.
Manufacturer’s instructions · iPhone ↗
Manufacturer’s instructions · Google Pixel / Android ↗
Manufacturer’s instructions · Samsung ↗
Manufacturer’s instructions · Huawei ↗
Manufacturer’s instructions · Honor ↗
Manufacturer’s instructions · Xiaomi / Redmi ↗
Manufacturer’s instructions · Motorola ↗
Manufacturer’s instructions · OPPO ↗
Manufacturer’s instructions · OnePlus ↗
On iOS 26, a Turn On Travel eSIM notification may appear after arrival. Choose the travel line for data and check whether you also want to keep your home line active. If no notification appears, use the manual steps below.
Check when your package starts: at payment, installation or first connection. If it starts on installation, install nearer your trip. Installing later does not postpone a package that started at payment.
These screens show settings on the models named below. Your operator and eSIM labels will differ. Screens retain the source language; each caption translates and identifies the control to use. Tap any image for a closer look.
iPhone 17 · iOS 26 · Screen source ↗
Use a stable Wi-Fi connection or hotspot. Your exact phone model must support eSIM and be unlocked for other operators.
Connect the phone you will use for your eSIM to Wi-Fi. Choose one of the two options below. If this eSIM is already installed, skip to choosing the line for mobile data.
You can add the eSIM by scanning its QR code in Settings. Follow the path below, choose the QR scanner and use the code for your own purchase. If the QR is on this same phone, see the options without a second screen below the guide.
iPhone: Settings → Mobile Service / Cellular → Add eSIM → Use QR Code → Scan QR Code → Continue
Google Pixel / Android: Settings → Network and Internet → SIMs → Add SIM → Set up an eSIM → scan your QR → Set up
Samsung: Settings → Connections → SIM manager → Add eSIM → Scan QR code → Add → Next
Huawei: Settings → Mobile network → SIM management → SIM 2 → Add eSIM → Add eSIM → Scan code → Add this eSIM
Honor: Settings → Mobile network → SIM management → Add eSIM → Add eSIM or transfer from your device → Set up an eSIM → Set up
Xiaomi / Redmi: Settings → Mobile networks → Use eSIM → Manage eSIM → Add eSIM → Add eSIM → scan your QR → confirm download
Motorola: Settings → Network & Internet → SIMs & mobile network → Download new SIM → Set up an eSIM → scan your QR → Set up
OPPO: Settings → Mobile network → SIM & eSIM settings → Add eSIM → Set up an eSIM → scan your QR → Set up
OnePlus: Settings → Mobile network → eSIM → Add eSIM → Add eSIM → Next → scan your QR → Set up
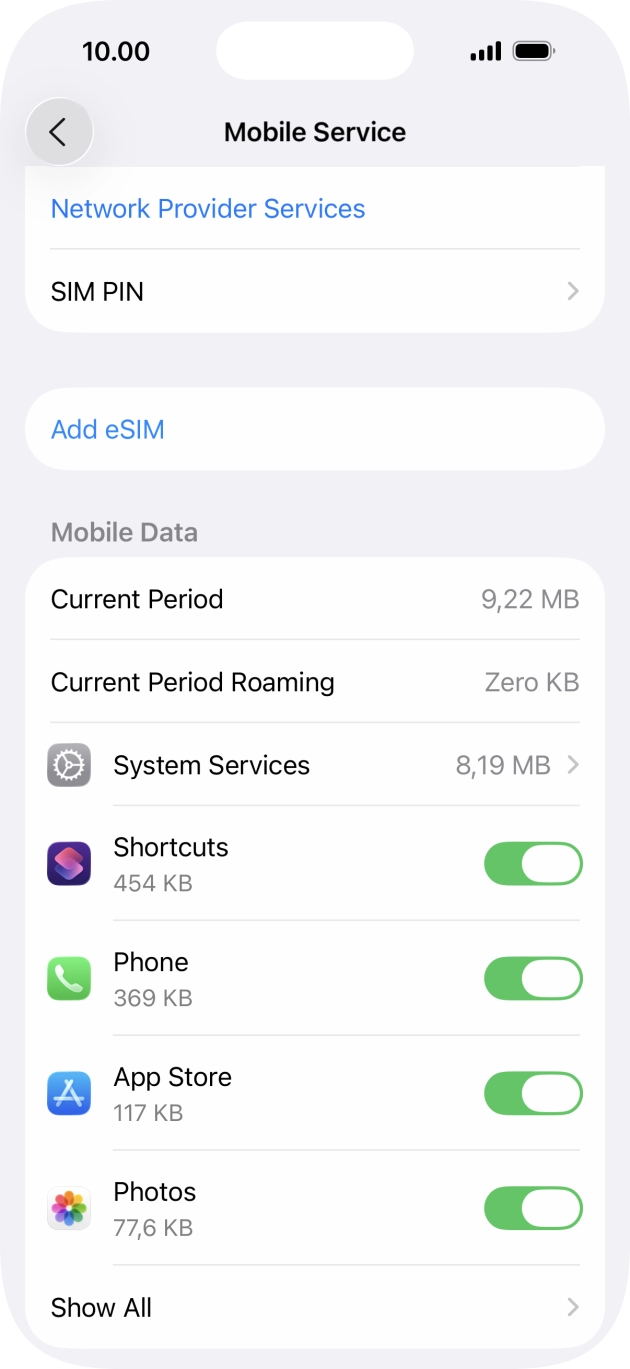 Enlarge screen ↗
The install button or your QR code opens the phone’s system setup. Confirm that you want to add the eSIM, then stay connected to Wi-Fi until the profile finishes downloading. If the phone first asks how to add an eSIM, use your QR code. You do not need to transfer your home SIM from another phone.
Continue / Add / Install / Set up → wait for the eSIM to download
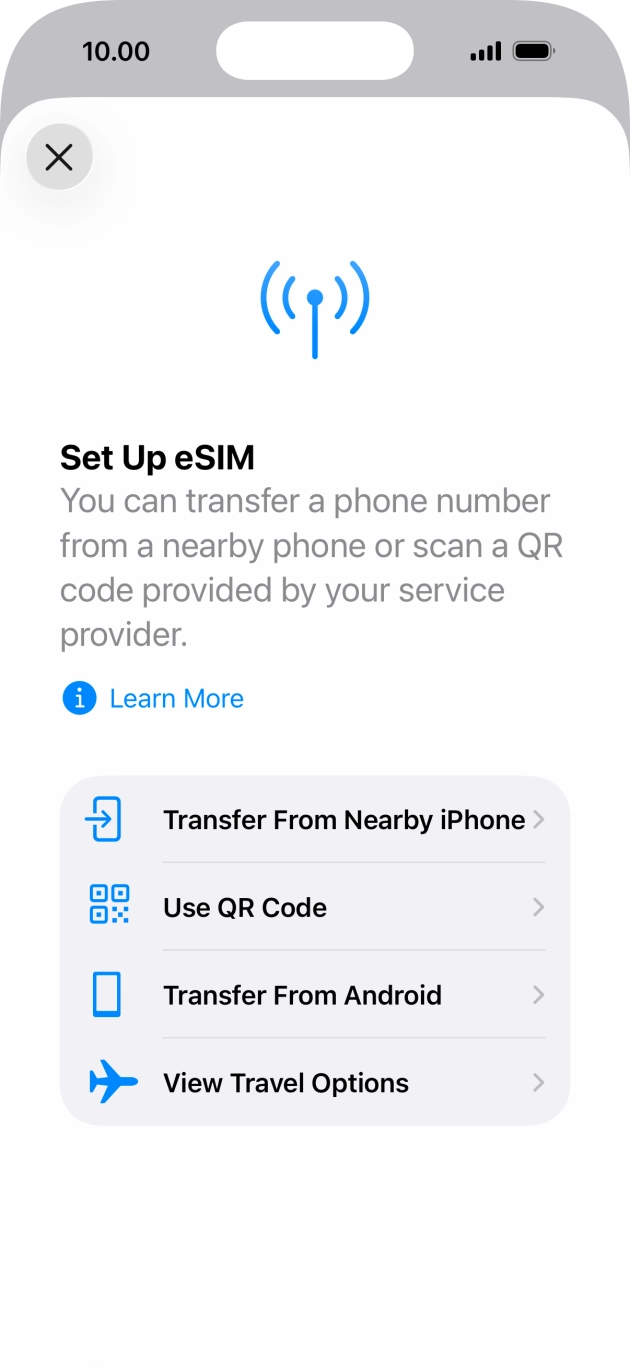 Enlarge screen ↗
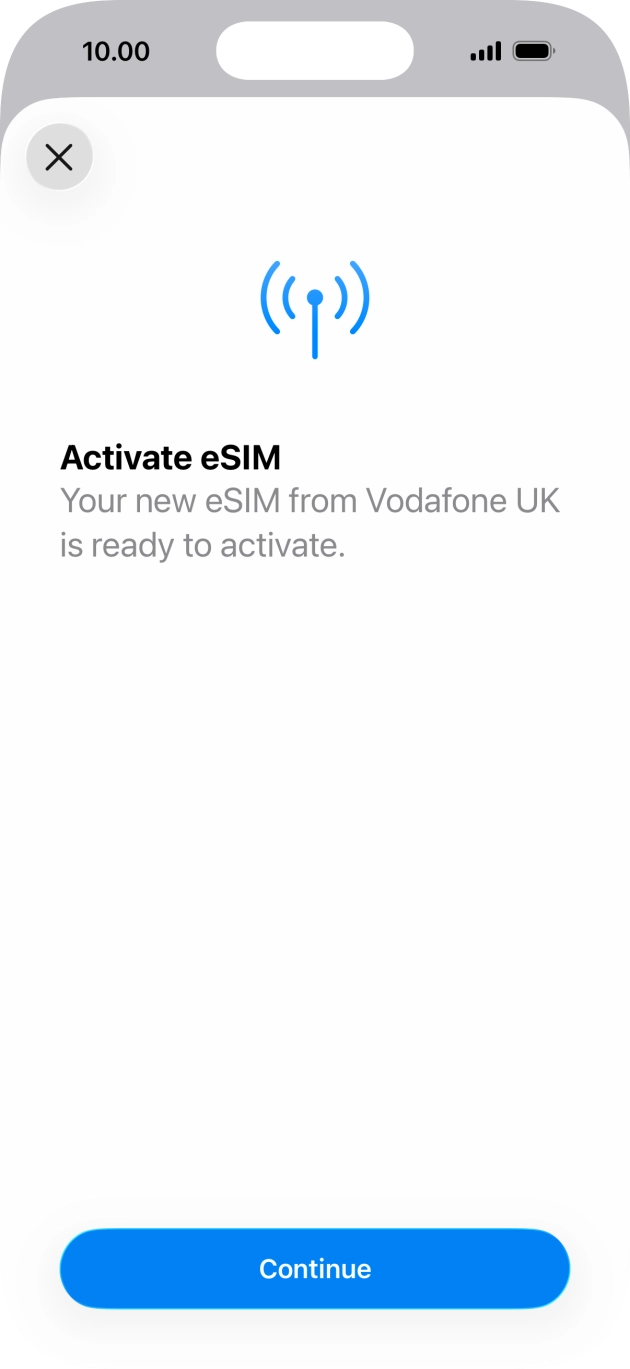 Enlarge screen ↗
For example, “Letisim British Virgin Islands”, so you can distinguish it from your home SIM. This is a label on your phone; it does not change the number or plan.
iPhone: Settings → Cellular / Mobile Service → new eSIM → Cellular Plan Label → Custom
Google Pixel / Android: Settings → Network & internet → SIMs → new eSIM → Edit name
Samsung: Settings → Connections → SIM manager → new eSIM → Name
Huawei: SIM management → SIM 2 → your eSIM → Card name. You can keep the existing label if no rename option is shown.
Honor: SIM management → SIM 2 → eSIM name. Rename it if your MagicOS version offers this option.
Xiaomi / Redmi: Manage eSIM → your plan → Change nickname, if available.
Motorola: Open the new eSIM in SIM settings and use the edit-name option if available.
OPPO: Open the installed profile in eSIM settings and change its label if your ColorOS version allows it.
OnePlus: Open the installed eSIM and edit its name if the option is available.
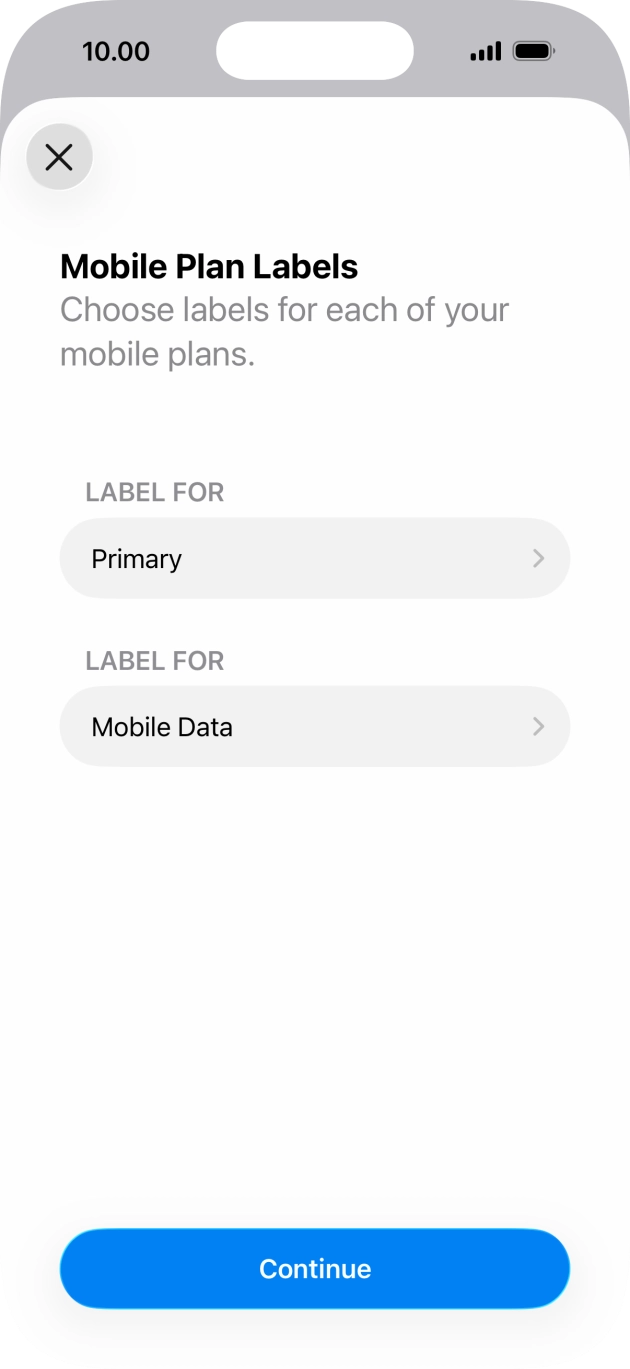 Enlarge screen ↗
Installation adds the eSIM to your phone. Choose it for mobile data at your destination. Package validity still follows its own start rule.
Turn on the new line and select it for mobile data. You can keep your home SIM for calls and texts at its usual rates. Turn off automatic mobile-data switching between SIMs.
iPhone: Settings → Cellular / Mobile Service → Cellular Data → Letisim. Turn off “Allow Cellular Data Switching”.
Google Pixel / Android: Settings → Network & internet → SIMs → Mobile data → Letisim
Samsung: Settings → Connections → SIM manager → Mobile data → Letisim
Huawei: In SIM management, enable the travel eSIM and select it as the default mobile-data SIM. Adding it may disable a physical SIM in slot 2.
Honor: In SIM management, enable the eSIM and choose it for mobile data. Check which physical SIM remains active.
Xiaomi / Redmi: Enable the travel plan in Manage eSIM, then select it for mobile data. Some models use eSIM instead of physical SIM 2.
Motorola: Network & internet → SIM settings: enable the travel eSIM and select it for mobile data.
OPPO: Enable the profile in Mobile network → eSIM, then select it for mobile data. The eSIM may occupy the SIM 2 position.
OnePlus: In Mobile network, enable the travel eSIM and choose it for mobile data. Turn off automatic switching to the other SIM.
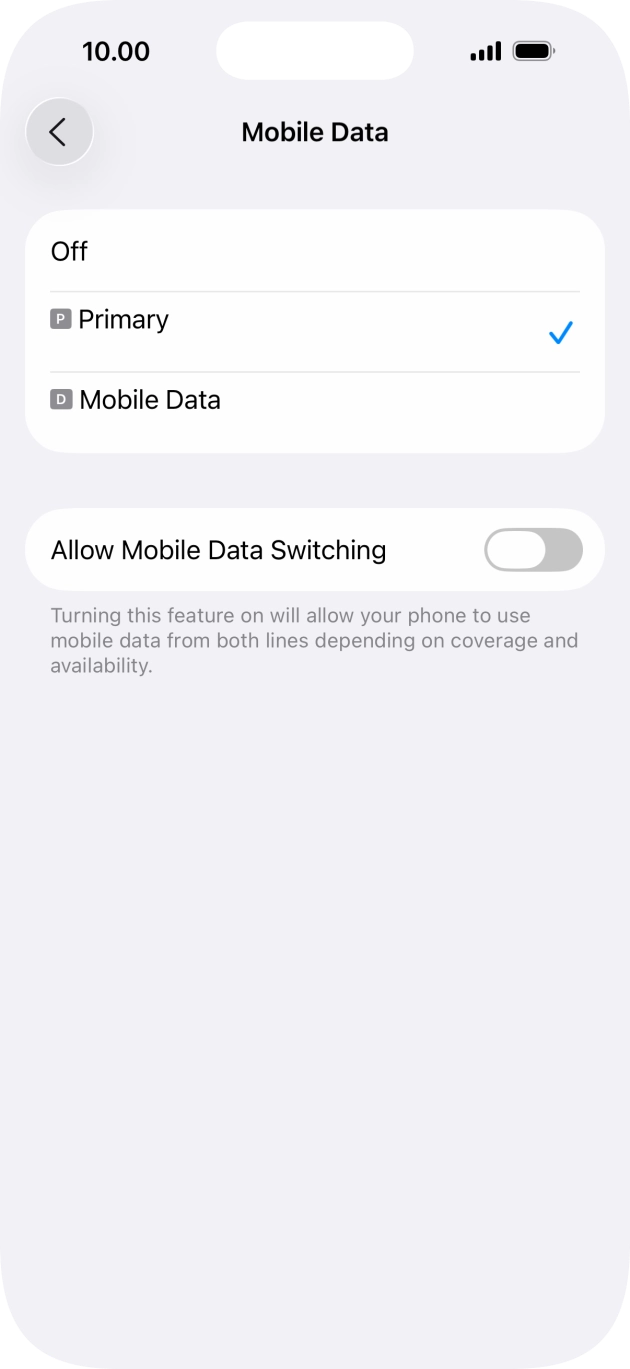 Enlarge screen ↗
If your eSIM instructions require data roaming, enable it for the Letisim line. Keep data roaming off on your home SIM. If an APN is specified, use the exact value in your own package’s guide.
iPhone: Settings → Cellular / Mobile Service → Letisim → Data Roaming (sometimes under Cellular Data Options)
Google Pixel / Android: Settings → Network & internet → SIMs → Letisim → Roaming
Samsung: First select Letisim for mobile data, then Settings → Connections → Mobile networks → Data roaming
Huawei: Open Mobile network → Mobile data and check data roaming for the travel SIM. Follow the settings in your package guide.
Honor: In the mobile-network settings, open the travel SIM’s data settings and enable roaming only if your package requires it.
Xiaomi / Redmi: In Mobile networks, open the travel SIM’s data-roaming settings. Use the roaming and APN values from your package guide.
Motorola: Open the travel eSIM’s network settings and check Roaming against your package instructions.
OPPO: Open the travel SIM’s mobile-network settings and enable data roaming if required by your package.
OnePlus: Open the travel SIM’s settings and check Data roaming against the instructions for your own package.
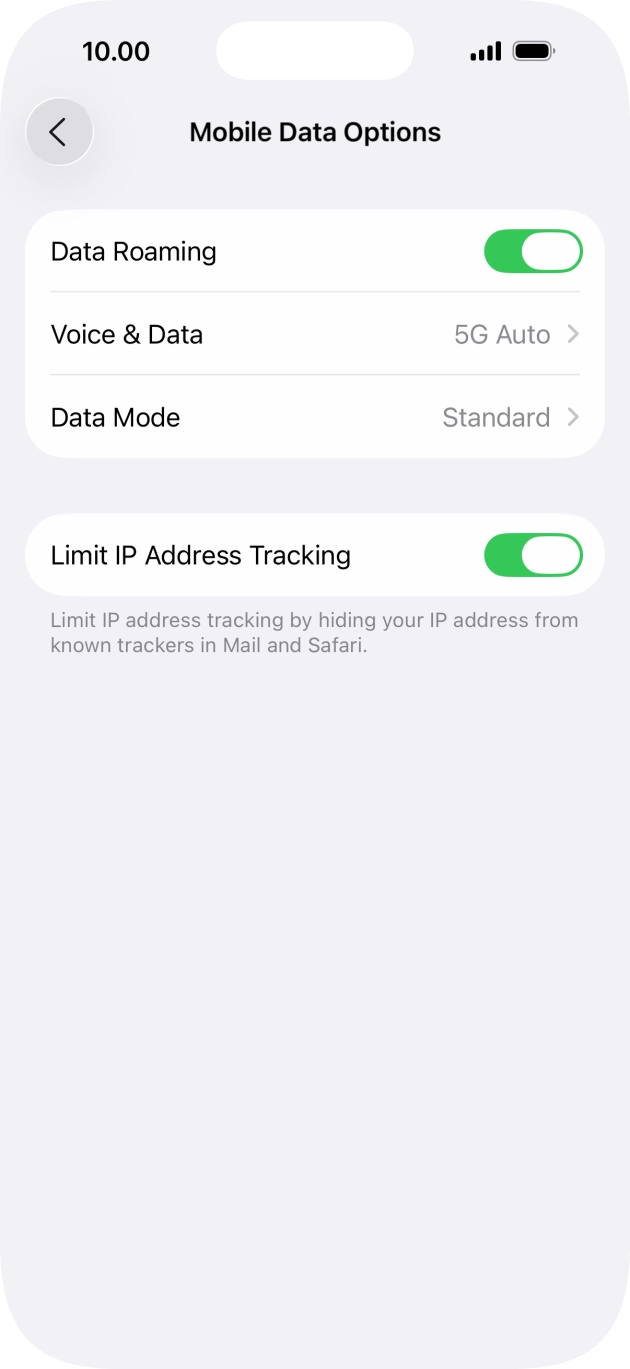 Enlarge screen ↗
Turn off Wi-Fi and open a map or website. If it loads, mobile data is working. If it does not, turn airplane mode on for about 30 seconds, turn it off and wait for a connection. Recheck the selected line and package settings.
Wi-Fi off → website loads → you are connected
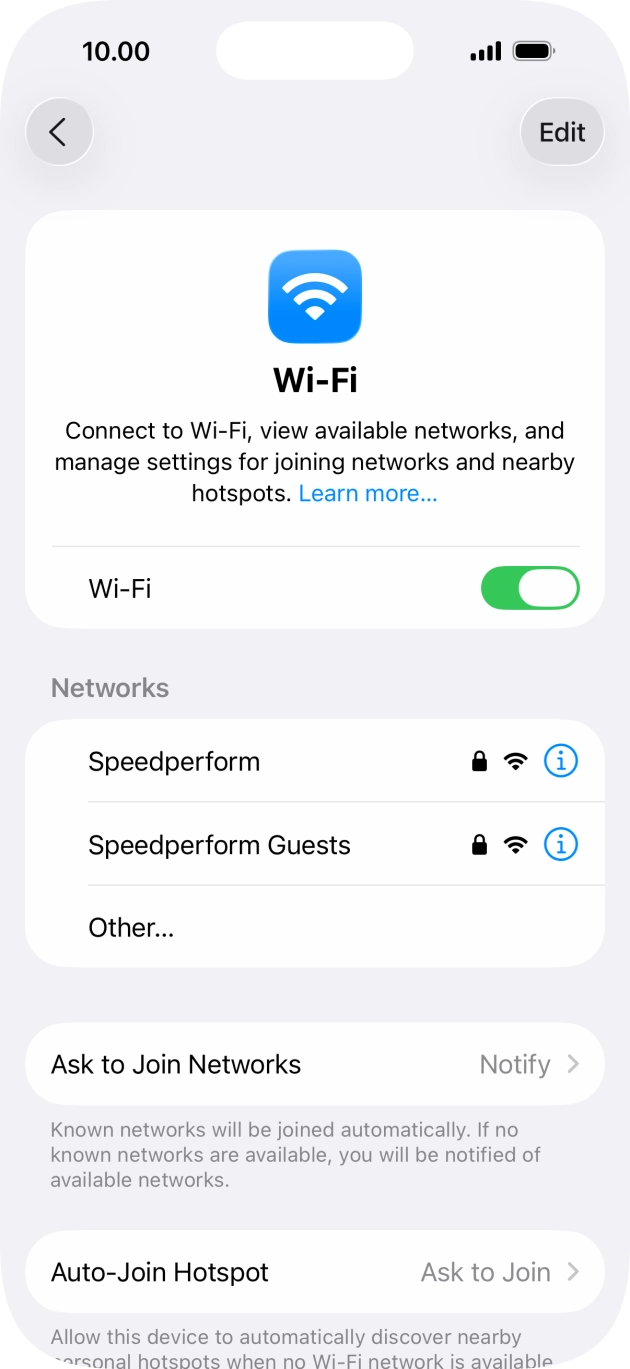 Enlarge screen ↗
If the scanner has a gallery button, save the QR from your order and choose that image. If your order includes manual installation details, choose Enter details manually and copy the fields exactly. The available methods depend on your phone and eSIM. If neither is available, contact support; do not scan a sample code from this guide or delete an installed eSIM.
Menu names can differ by phone model and system version.
04 / Operators
Compare network coverage separately from speed. A national result does not predict reception inside your hotel or along a mountain road.
The TRC materials identify three mobile network operators in the territory: CCT, Digicel and Flow. Traveller-facing coverage should still be checked by area and device, because operator maps and public regulator coverage pages are what show where service is expected, not a promise for every beach, bay or ferry crossing.
Public LTE coverage map on the operator site. Useful for checking expected signal before islands-hopping. [1] [3]
Check coverage ↗TRC hosts the operator comparison coverage maps. The Flow operator page confirms current licensing, while the regulator page is the practical place to compare service areas. [1] [2] [4]
Check coverage ↗TRC coverage comparison page is the public reference for looking up CCT alongside the other mobile networks. [1] [2] [4]
Check coverage ↗The network in your chosen package is what matters. This country comparison does not mean every plan includes every operator. 5G depends on the package, phone and local coverage.
05 / Coverage
Check the addresses and roads you will actually use. Save maps and booking details before leaving Wi-Fi.
This is the easiest place to arrive with an eSIM already installed, since you are likely to want maps, taxis, ferry timings and message apps right away. Save offline maps before you cross to quieter coast roads, and keep your home SIM separate so roaming charges do not surprise you. [5] [8]
For ferry and sightseeing days, download your route and booking details in advance. Service needs can change between the main settlement, beach stops and viewpoints, so a plan with enough data is more comfortable than relying on one live connection all day. [5]
Anegada is best treated as a day or overnight island where offline navigation, saved hotel details and messaging matter more than constant browsing. Check your operator’s coverage page before going, especially if you plan to move around the island rather than stay in one resort. [2] [5]
This is a good place to prepare for shorter stays, boat transfers and beach time. Keep boarding passes, reservations and maps offline, because a plan that works well in Road Town may feel different once you are moving by ferry or water taxi. [5] [8]
British Virgin Islands · eSIM
The territory’s mobile market is small but not single-network: the regulator lists CCT, Digicel and Flow as mobile operators, so a traveller can compare operator pages and public coverage maps instead of assuming one uniform experience. That matters here because your day may move between Road Town, ferries, beaches and quieter island roads, where practical connectivity needs change faster than the scenery.
An eSIM works well when you want data for navigation, hotel messages, ride requests and quick photo sharing without juggling your home SIM. For the best fit, think in terms of the places you will actually visit and the amount of live internet you need each day. If you are hopping between Tortola, Virgin Gorda, Anegada or Jost Van Dyke, it is sensible to save offline maps and keep a little spare data for last-minute transport changes.
Official BVI tourism app for finding verified attractions and local businesses across the islands. [6]
Useful for downloading maps in advance and navigating with stored areas when mobile data is limited. [7]
The territory has three mobile network operators listed by the regulator, so travellers can compare package compatibility, coverage maps and service pages rather than assuming a single island-wide experience. For an eSIM, that usually means choosing a data allowance that matches ferries, day trips and social apps, then checking the operator map for the islands you will actually visit. [1] [2] [3] [4]
BVI Now was introduced as a local travel app to help visitors find tourism businesses and attractions, and Apple Maps supports offline downloads. That makes a strong combination for a short stay: save the areas you need, then use mobile data mainly for live updates, ride-hailing, ferry changes and sharing. [6] [7]
06 / FAQ
The regulator’s current mobile-operator listings point to CCT, Digicel and Flow. That means your decision is less about a single national network and more about which operator’s coverage map and package fit your itinerary. If you spend most of your time around Road Town and Tortola, that may look different from an island-hopping trip that includes ferries and smaller cays. Check the public coverage pages first, then choose a data amount that matches maps, messaging and travel-day browsing. [1] [2] [3] [4]
It can be, but only if you size it for your actual habits. Short stays that rely on maps, taxi apps, hotel chat and ferry updates usually need less data than days spent on video, uploads or hotspot use. Because travel in the British Virgin Islands often includes moving between islands, it is wise to leave a buffer rather than buying the smallest package. A slightly larger plan is often more comfortable than running out in the middle of a transfer. [5] [6] [7]
Yes. That is the simplest way to avoid setup stress after landing or boarding a ferry. You can install the eSIM while you still have stable Wi‑Fi, then keep it ready for first connection when you reach the islands. This also helps if your plan begins on purchase, on install or on first connection, because you can choose the timing that best matches your trip. Your home SIM remains separate, so voice or SMS charges from your regular operator do not get mixed into your data plan. [6] [7]
For smaller-island days, prepare as if your connection will be used mainly for essentials: navigation, reservations, local messages and transport coordination. Save maps before you go, keep booking details offline and avoid depending on constant streaming or large uploads. Those islands are exactly where a traveller benefits from a plan that covers ordinary everyday use smoothly rather than one built around heavy daily consumption. [5] [7]
The BVI Now app is helpful because it was created for visitor information and verified local listings, but it does not replace your data connection for everything. It is best used together with an eSIM and offline maps: the app helps you find places, while your mobile data supports live navigation, messages, bookings and last-minute transport changes. That combination is especially useful if you move between islands or arrive with a short stay and limited time. [6] [7] [8]